
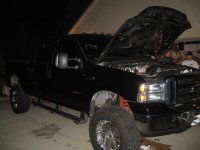
Blk350on20s
Line em up!!
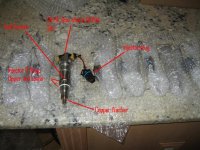
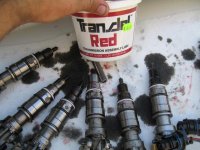
Injectors on a 6.0 are intimidating but not that bad to do. Heres what the injector looks like and some description for later on in the install.http://www.competitiondiesel.com/forums/attachment.php?attachmentid=3789&stc=1&d=1183654062
8.JPG
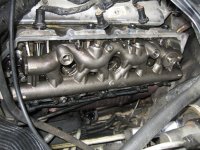
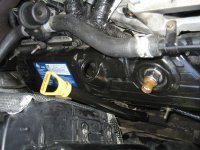
Heres what you will be looking at for about 5 hours.http://www.competitiondiesel.com/forums/attachment.php?attachmentid=3782&stc=1&d=1183652490
1.JPG
As always disconnect both batteries. The first step is removing your air box and tubes going all the way to the turbo. Your ccv tube will be pulled out with your last intake tube. 2 of the nuts that hold your computer on over the driver side valve cover will be removed in this process. They are 10mm.
2. Remove the 2 5/16 bolts holding your degas bottle on and pull it out and rest it on your battery.
3. Now remove the 2 8mm bolts that hold the back of your computer on. There are 2 bolts and an oval shaped plate that go across that. make sure not to lose those. There are 3 plugs on the bottom of the computer. To remove them squeeze on the left and right side of the connectors and pull down.
4. Now that is out of the way remove the 2 brackets that held the computer up. They are 10mm nuts that are on studs from the valve cover. There are 2 nuts on each. You may need to hold the studs from moving with a 12mm open end wrench. Once those are removed it should look like this http://www.competitiondiesel.com/forums/attachment.php?attachmentid=3786&stc=1&d=1183653399
2.JPG
5. Now disconnect the plug that has a red slide going through it. You need to slide the red clip over and then push down on the tab to remove. I found it easy to combine a few zip ties and wrap the whole mess of plugs together and tie them off towards the turbo. Makes it much easier to work.
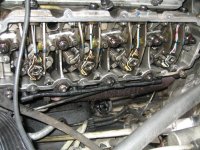
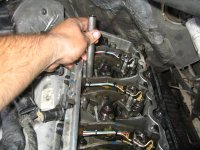
6. Now its time to remove the valve cover and injector plugs. Every stud and bolt are all 12mm. You will need deep and short sockets with assorted extensions. Carefully remove the valve cover and gasket. Once that is removed you will see the high pressure oil rail. In my truck(05) there were 9 bolts holding it in. I think there are 8 on earlier years. They are a Torx 30. Remove those.
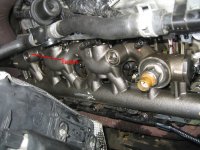
7. The rail is now held in place by the 4 injectors and the stand pipe by their O rings. You can remove the rail and stand pipe together on the drives side by picking up on it evenly but the passenger side is a completely different story. On the 05 the stand pipe was held in by orings on both the head and rail side. I believe early models might have been threaded. (put something under the truck to avoid a mess because oil will come out of the rail and drip down)Here is what the rail looks like.http://www.competitiondiesel.com/forums/attachment.php?attachmentid=3783&stc=1&d=1183653112
4.JPG
8. You are now to the injectors. First unhook the connectors on the outside of the head. I used a valve stem remover to push on the clip and that worked great. Once removed use a 19mm 12 point socket and push down on the connector stuck into the head. This will unclip it from the head. Then push the rest of it through the head.
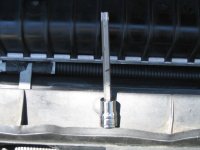
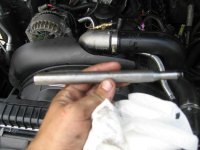
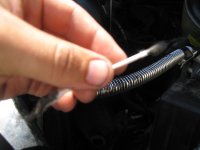
9. Now its time to remove the injectors. You will need a long Torx 40(about 3-4 inches). http://www.competitiondiesel.com/forums/attachment.php?attachmentid=3790&stc=1&d=1183654667
9.JPG While undoing the bolt the injector will come out with the hold down. Once removed, check the injector for its copper washer at the tip. This is critical. If it is not you will have to find it.
10. You will need fresh oil to do this step. Check your new injector for good O rings and its copper washer at the tip. If they are not good or you are refurbishing yours then here is what you will do. Remove The old Orings and Coppers. To get the copper off use a razor blade to carefully get underneath the copper and pry it up, then you can pull it off with your fingers. Let the injectors soak in kerosene or diesel fuel. http://www.competitiondiesel.com/forums/attachment.php?attachmentid=3791&stc=1&d=1183654978
10.JPG
Scrub with a copper or brass brush between the lower O ring and Copper. Then spray it down with parts cleaner.
To install the Orings I used trans assembly lube. Just lube the Orings good and start with the upper and carefully roll it into place. Move to the Lower Oring and do the same. Let the injectors set for a little before you put them in to let the Orings go back to there normal state. The coppers are easy. Use a 9mm 12 point deep well socket and press evenly on the copper to seat it on the injector. http://www.competitiondiesel.com/forums/attachment.php?attachmentid=3792&stc=1&d=1183654978
11.JPG
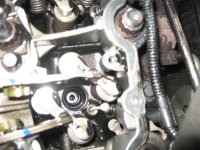
Now thatis done you need to lube the Orings with either fresh oil or the trans assembly lube. The injectors are notched so dont worry about placement. Here is a pic of the hold down http://www.competitiondiesel.com/forums/attachment.php?attachmentid=3793&stc=1&d=1183655717
12.JPG Before you put your injector in, take a whole bunch of cue tips and place them in the hold down bolt holes. You cannot compress liquid so they need to be clean. I found out the hard way. http://www.competitiondiesel.com/forums/attachment.php?attachmentid=3798&stc=1&d=1183656729
16.JPG http://www.competitiondiesel.com/forums/attachment.php?attachmentid=3799&stc=1&d=1183656729
17.JPG
Insert injector and its hold down in the valley together. Just set it in place. Now tighten the T40 bolt and it will slowly pull the injector down and seat it. Torque them down to 24ftlbs or 33Nm. After all injectors are in and tightened down, go back around and re-torque them. Push there connectors through the hole till you hear them click in. Now fill each injector with oil in the top of it. It doesn't take much.
11. Now its basically a reverse process. Remove the stand pipe from the oil rail and place it and seat it in its hole. http://www.competitiondiesel.com/forums/attachment.php?attachmentid=3796&stc=1&d=1183656729
14.JPG http://www.competitiondiesel.com/forums/attachment.php?attachmentid=3797&stc=1&d=1183656729
15.JPG Now place the oil rail over the injectors and stand pipe and seat that making sure that everything is lined up. Install the bolts and once again torque them to spec. 96inlbs or 11Nm.
12. Now reverse the process remembering to torque everything to spec. and hook up all of the plugs. Everyone is different except for the injector plugs but those are wired to their connectors so it is impossible to put on in the wrong spot.
The passenger side is a little harder due to the lack of space. Some people say to remove the heater box but I find that to be a lot more work.
1. Remove the pass. side inter cooler tube. You will need a deep well 7/16 to do so. Next remove your oil filler tube. it just screws in.
2. Remove the IP plug, and the 2 Glow plug module connectors along with the cable that is attached to the top of the positive battery connection and pull those towards the center of the motor. Also undo the injector connectors at the top of the head.
3. Remove the 4 10mm nuts holding on the glow plug module. You may need to hold the studs with the 12mm open end wrench. Once that is removed disconnect the "plug" on the passenger side. You will need to slide the red clip over and press down on the tab to remove. Reroute that towards the front of the motor to free up some room. Heres what the Glow plug module looks like.http://www.competitiondiesel.com/forums/attachment.php?attachmentid=3794&stc=1&d=1183656026
13.JPG
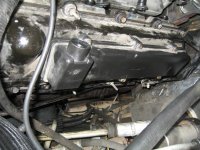
4. You are now ready to remove the valve cover. I found it easier to remove the inner wheel well(thanks Robts). There are 4 5.5mm bolts on the fender lip, 3 8mm bolts- 1 just to the left of the coil, 1 in the upper center of the wheel well, and 1 under the whole setup on the right. there are 3 11mm nuts that hold a vacuum box 2 or 3 plastic clips that hold it to the fender under the door. Once all of those are removed lift the vacuum box up, pulling the studs out of the holes. Now manipulate the inner fender out, be careful not to destroy the insulation that is connected to the top of it. Once that is removed you can get to the 2 bolts that are under the air box that hold the valve cover on. I used a 12mm closed end. Heres what the valve cover looks like. http://www.competitiondiesel.com/forums/attachment.php?attachmentid=3787&stc=1&d=1183653399
3.JPG
5. Now repeat the steps for the drivers side to get to the oil rail. Be careful not to break the IP sensor while removing the valve cover. To remove the rail I had to lift up on the back of it(The side closest to the firewall) to remove it without the stand pipe. I had trouble with the stand pipe popping out of the head instead of the rail when I lifted it up evenly. An easier way to remove it is by removing either the allen(05) or 1/2" square for a ratchet. http://www.competitiondiesel.com/forums/attachment.php?attachmentid=3795&stc=1&d=1183656447
5.JPG Once that is out reverse the process to get it together. Now connect your battery cable and double check everything.
You are all done. Know to start it. Thanks to Dan(Sogrand), Doug(Stuckinmud), Rob(Robts) and Rich from TDR I figured out how to start it. You will need to hook battery chargers up to the truck. You will need to crank the truck over for 30-40 seconds, then let it set for 20 seconds and repeat this process until it fires up. There is a lot of air in the system and it needs to build oil pressure to start. This is because the injectors fire by oil pressure so if theres no oil pressure or not enough there will be no fuel injected into the cylinders. I was getting frustrated as all H*ll but this is how you have to do it. Once it starts let it idle for a while to purge most of the air out of the system and then give it a rip.
Feel free to add anything if I missed something.
Good luck Ryan
8.JPG
Heres what you will be looking at for about 5 hours.http://www.competitiondiesel.com/forums/attachment.php?attachmentid=3782&stc=1&d=1183652490
1.JPG
As always disconnect both batteries. The first step is removing your air box and tubes going all the way to the turbo. Your ccv tube will be pulled out with your last intake tube. 2 of the nuts that hold your computer on over the driver side valve cover will be removed in this process. They are 10mm.
2. Remove the 2 5/16 bolts holding your degas bottle on and pull it out and rest it on your battery.
3. Now remove the 2 8mm bolts that hold the back of your computer on. There are 2 bolts and an oval shaped plate that go across that. make sure not to lose those. There are 3 plugs on the bottom of the computer. To remove them squeeze on the left and right side of the connectors and pull down.
4. Now that is out of the way remove the 2 brackets that held the computer up. They are 10mm nuts that are on studs from the valve cover. There are 2 nuts on each. You may need to hold the studs from moving with a 12mm open end wrench. Once those are removed it should look like this http://www.competitiondiesel.com/forums/attachment.php?attachmentid=3786&stc=1&d=1183653399
2.JPG
5. Now disconnect the plug that has a red slide going through it. You need to slide the red clip over and then push down on the tab to remove. I found it easy to combine a few zip ties and wrap the whole mess of plugs together and tie them off towards the turbo. Makes it much easier to work.
6. Now its time to remove the valve cover and injector plugs. Every stud and bolt are all 12mm. You will need deep and short sockets with assorted extensions. Carefully remove the valve cover and gasket. Once that is removed you will see the high pressure oil rail. In my truck(05) there were 9 bolts holding it in. I think there are 8 on earlier years. They are a Torx 30. Remove those.
7. The rail is now held in place by the 4 injectors and the stand pipe by their O rings. You can remove the rail and stand pipe together on the drives side by picking up on it evenly but the passenger side is a completely different story. On the 05 the stand pipe was held in by orings on both the head and rail side. I believe early models might have been threaded. (put something under the truck to avoid a mess because oil will come out of the rail and drip down)Here is what the rail looks like.http://www.competitiondiesel.com/forums/attachment.php?attachmentid=3783&stc=1&d=1183653112
4.JPG
8. You are now to the injectors. First unhook the connectors on the outside of the head. I used a valve stem remover to push on the clip and that worked great. Once removed use a 19mm 12 point socket and push down on the connector stuck into the head. This will unclip it from the head. Then push the rest of it through the head.
9. Now its time to remove the injectors. You will need a long Torx 40(about 3-4 inches). http://www.competitiondiesel.com/forums/attachment.php?attachmentid=3790&stc=1&d=1183654667
9.JPG While undoing the bolt the injector will come out with the hold down. Once removed, check the injector for its copper washer at the tip. This is critical. If it is not you will have to find it.
10. You will need fresh oil to do this step. Check your new injector for good O rings and its copper washer at the tip. If they are not good or you are refurbishing yours then here is what you will do. Remove The old Orings and Coppers. To get the copper off use a razor blade to carefully get underneath the copper and pry it up, then you can pull it off with your fingers. Let the injectors soak in kerosene or diesel fuel. http://www.competitiondiesel.com/forums/attachment.php?attachmentid=3791&stc=1&d=1183654978
10.JPG
Scrub with a copper or brass brush between the lower O ring and Copper. Then spray it down with parts cleaner.
To install the Orings I used trans assembly lube. Just lube the Orings good and start with the upper and carefully roll it into place. Move to the Lower Oring and do the same. Let the injectors set for a little before you put them in to let the Orings go back to there normal state. The coppers are easy. Use a 9mm 12 point deep well socket and press evenly on the copper to seat it on the injector. http://www.competitiondiesel.com/forums/attachment.php?attachmentid=3792&stc=1&d=1183654978
11.JPG
Now thatis done you need to lube the Orings with either fresh oil or the trans assembly lube. The injectors are notched so dont worry about placement. Here is a pic of the hold down http://www.competitiondiesel.com/forums/attachment.php?attachmentid=3793&stc=1&d=1183655717
12.JPG Before you put your injector in, take a whole bunch of cue tips and place them in the hold down bolt holes. You cannot compress liquid so they need to be clean. I found out the hard way. http://www.competitiondiesel.com/forums/attachment.php?attachmentid=3798&stc=1&d=1183656729
16.JPG http://www.competitiondiesel.com/forums/attachment.php?attachmentid=3799&stc=1&d=1183656729
17.JPG
Insert injector and its hold down in the valley together. Just set it in place. Now tighten the T40 bolt and it will slowly pull the injector down and seat it. Torque them down to 24ftlbs or 33Nm. After all injectors are in and tightened down, go back around and re-torque them. Push there connectors through the hole till you hear them click in. Now fill each injector with oil in the top of it. It doesn't take much.
11. Now its basically a reverse process. Remove the stand pipe from the oil rail and place it and seat it in its hole. http://www.competitiondiesel.com/forums/attachment.php?attachmentid=3796&stc=1&d=1183656729
14.JPG http://www.competitiondiesel.com/forums/attachment.php?attachmentid=3797&stc=1&d=1183656729
15.JPG Now place the oil rail over the injectors and stand pipe and seat that making sure that everything is lined up. Install the bolts and once again torque them to spec. 96inlbs or 11Nm.
12. Now reverse the process remembering to torque everything to spec. and hook up all of the plugs. Everyone is different except for the injector plugs but those are wired to their connectors so it is impossible to put on in the wrong spot.
The passenger side is a little harder due to the lack of space. Some people say to remove the heater box but I find that to be a lot more work.
1. Remove the pass. side inter cooler tube. You will need a deep well 7/16 to do so. Next remove your oil filler tube. it just screws in.
2. Remove the IP plug, and the 2 Glow plug module connectors along with the cable that is attached to the top of the positive battery connection and pull those towards the center of the motor. Also undo the injector connectors at the top of the head.
3. Remove the 4 10mm nuts holding on the glow plug module. You may need to hold the studs with the 12mm open end wrench. Once that is removed disconnect the "plug" on the passenger side. You will need to slide the red clip over and press down on the tab to remove. Reroute that towards the front of the motor to free up some room. Heres what the Glow plug module looks like.http://www.competitiondiesel.com/forums/attachment.php?attachmentid=3794&stc=1&d=1183656026
13.JPG
4. You are now ready to remove the valve cover. I found it easier to remove the inner wheel well(thanks Robts). There are 4 5.5mm bolts on the fender lip, 3 8mm bolts- 1 just to the left of the coil, 1 in the upper center of the wheel well, and 1 under the whole setup on the right. there are 3 11mm nuts that hold a vacuum box 2 or 3 plastic clips that hold it to the fender under the door. Once all of those are removed lift the vacuum box up, pulling the studs out of the holes. Now manipulate the inner fender out, be careful not to destroy the insulation that is connected to the top of it. Once that is removed you can get to the 2 bolts that are under the air box that hold the valve cover on. I used a 12mm closed end. Heres what the valve cover looks like. http://www.competitiondiesel.com/forums/attachment.php?attachmentid=3787&stc=1&d=1183653399
3.JPG
5. Now repeat the steps for the drivers side to get to the oil rail. Be careful not to break the IP sensor while removing the valve cover. To remove the rail I had to lift up on the back of it(The side closest to the firewall) to remove it without the stand pipe. I had trouble with the stand pipe popping out of the head instead of the rail when I lifted it up evenly. An easier way to remove it is by removing either the allen(05) or 1/2" square for a ratchet. http://www.competitiondiesel.com/forums/attachment.php?attachmentid=3795&stc=1&d=1183656447
5.JPG Once that is out reverse the process to get it together. Now connect your battery cable and double check everything.
You are all done. Know to start it. Thanks to Dan(Sogrand), Doug(Stuckinmud), Rob(Robts) and Rich from TDR I figured out how to start it. You will need to hook battery chargers up to the truck. You will need to crank the truck over for 30-40 seconds, then let it set for 20 seconds and repeat this process until it fires up. There is a lot of air in the system and it needs to build oil pressure to start. This is because the injectors fire by oil pressure so if theres no oil pressure or not enough there will be no fuel injected into the cylinders. I was getting frustrated as all H*ll but this is how you have to do it. Once it starts let it idle for a while to purge most of the air out of the system and then give it a rip.
Feel free to add anything if I missed something.
Good luck Ryan
Attachments
-
 1.JPG61.1 KB · Views: 324
 -
 4.JPG107.9 KB · Views: 402
 -
 6.JPG116.7 KB · Views: 136
 -
 2.JPG93.7 KB · Views: 294
 -
 3.JPG85.6 KB · Views: 216
 -
 7.JPG109.1 KB · Views: 127
 -
 8.JPG99 KB · Views: 278
 -
 9.JPG53.1 KB · Views: 275
 -
 10.JPG85.5 KB · Views: 297
 -
 11.JPG82.5 KB · Views: 266
 -
 12.JPG49.6 KB · Views: 242
 -
 13.JPG88.4 KB · Views: 240
 -
 5.JPG97.1 KB · Views: 236
 -
 14.JPG57.9 KB · Views: 245
 -
 15.JPG93.8 KB · Views: 255
 -
 16.JPG82.8 KB · Views: 275
 -
 17.JPG42 KB · Views: 241
Last edited: