| Advertisement |
|
|
|
|
|
|
|
If this is your first visit, be sure to check out the FAQ by clicking the link above.
You may have to register before you can post: click the register link above to proceed.
To start viewing messages, select the forum that you want to visit from the selection below.
|
 07-21-2014, 10:11 AM
|
#1
|
Name: Mark Nixon
Title: No Savior among the flesh
Status: Not Here
Join Date: Feb 2009
Location: Brownville, Nebraska
Member`s Gallery
Posts: 8,676
|
Dash Replacement How To
You're in luck, I have a complete beat up dash that is out and would make a perfect subject to do this write up on.
I'm going to get some grub and change into warm weather clothes, then go disassemble this thing and take pics to illustrate.
It'll take HOURS to document what normally takes me an hour or less to do. 
Mark.
__________________
If you or I did business like the PEOPLE in government do business, we'd be put in jail. Government is coercive.
Anarchy: The state of existence where there are no masters & no slaves. Therefore, Anarchy means the ABSENCE OF SLAVERY, or, in other words, FREEDOM.
|
|
|
|
|
07-21-2014, 01:37 PM
|
#2
|
Name: Mark Nixon
Title: No Savior among the flesh
Status: Not Here
Join Date: Feb 2009
Location: Brownville, Nebraska
Member`s Gallery
Posts: 8,676
|
Okay, you asked for it!
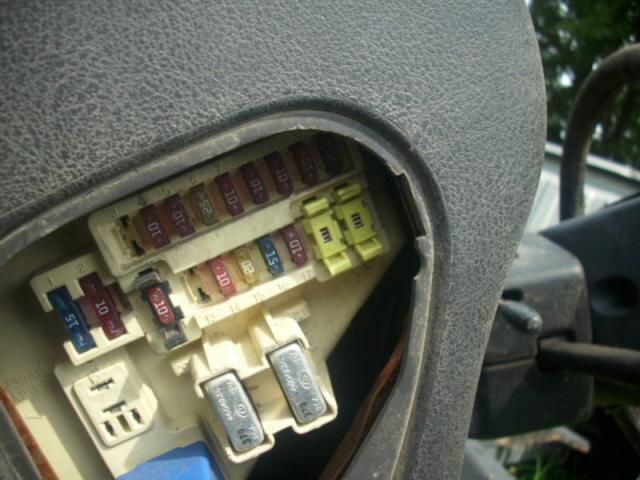
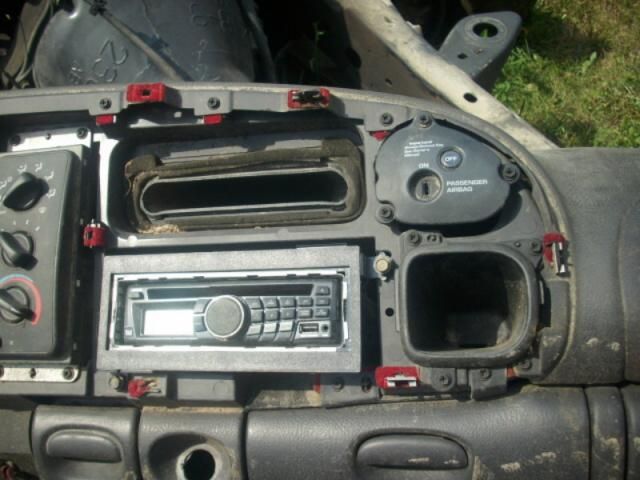
Before I started anything, I would definitely pull any air bag fuses and disconnect the batteries.
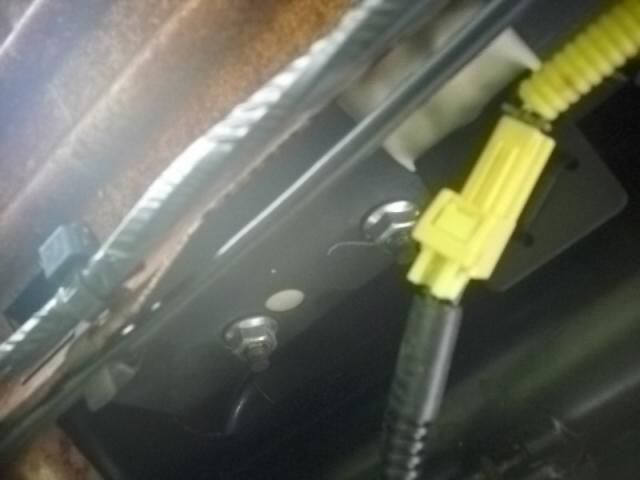
The air bag fuses are the ones in the yellow clips in this pic:
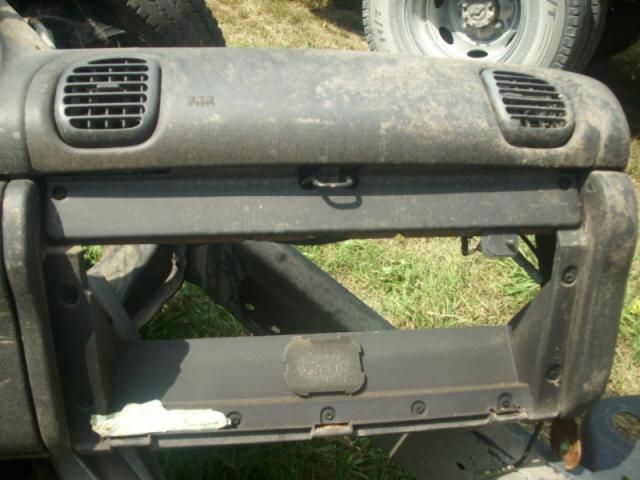
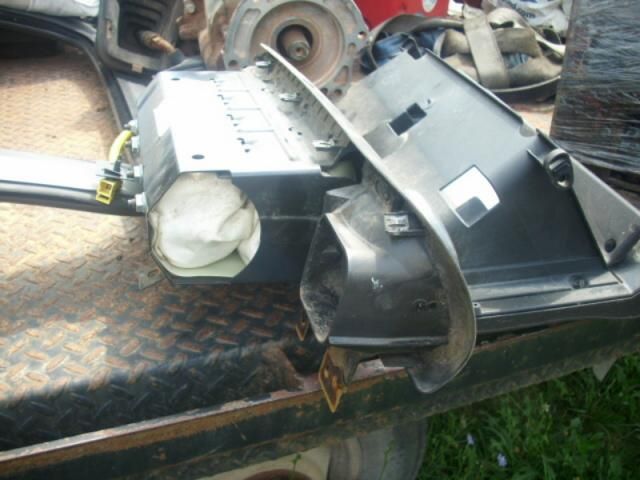
Here is a pic of my guinea pig for this article, note that it is not installed in the vehicle. I will still run through the procedure for "tipping" it:
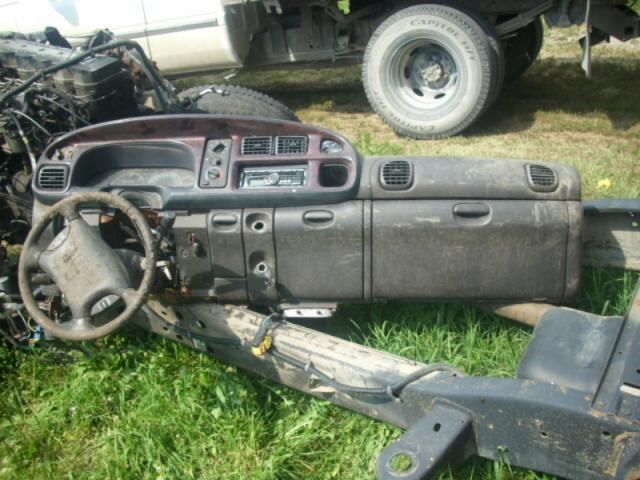
Honestly, the way I do it is "tip" the dash back, which means you need to at least drop the column (not "remove" it, per se).
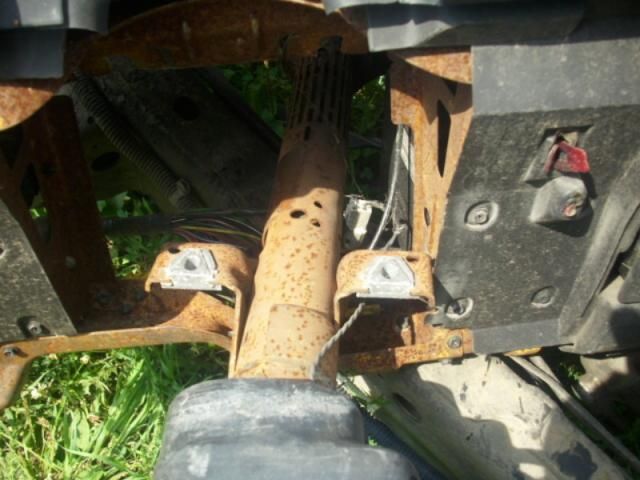
To do this I start by dropping the column down, after removing the bolster cover, then the automatic indicator cable.
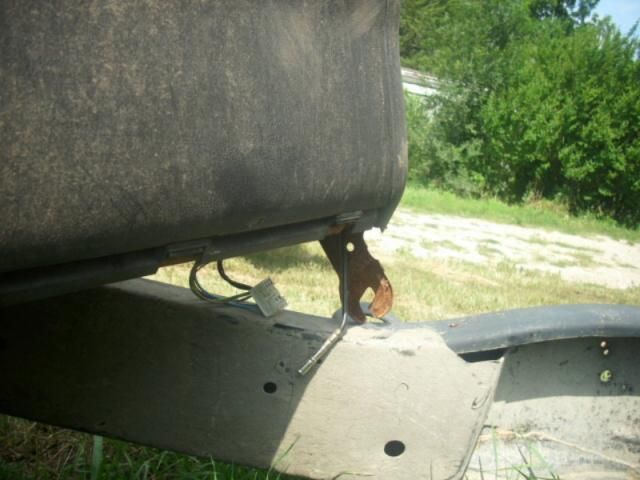
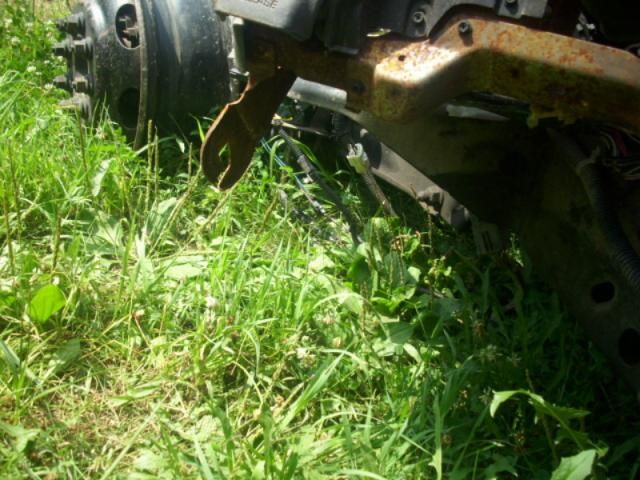
I then remove both driver's and passenger's side kick/sill panes and LOOSEN both corner bolts at the ends of the dash, which are located under the kick panels.
The next 3 pics illustrate the ends of the dash and the column "dropped":
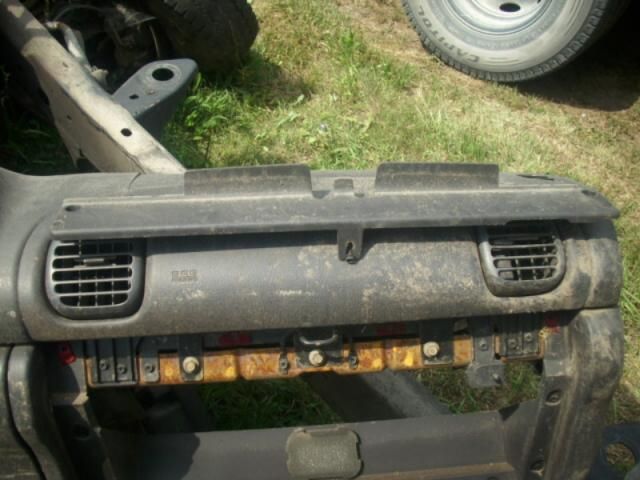
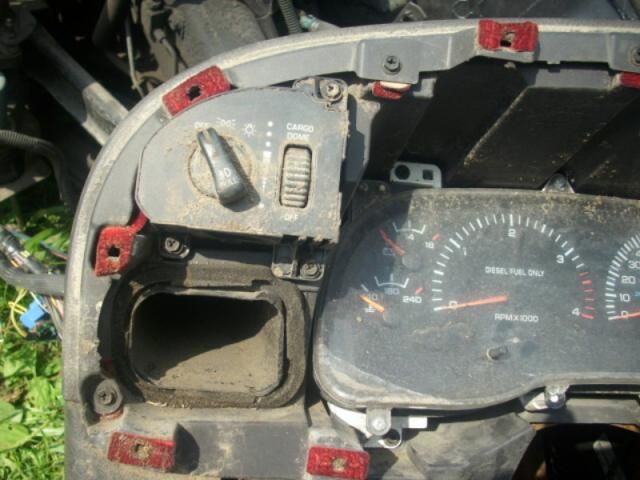
Once the column is dropped, I then remove the instrument cluster bezal, STARTING AT THE BOTTOM EDGE FIRST, as pictured here:
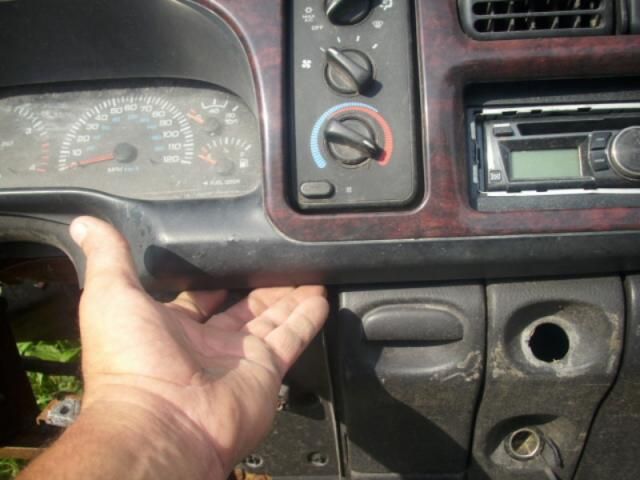
Be careful when pulling it free from the clips, the retainers are as flimsy as the cover itself is!
Just work your way around tugging or using a medium screwdriver and some sense.
Next, I'll want to remove the bomb (air bag) from the passenger's side, so I'll open the glovebox, remove it by collapsing each side inward to release the stops and drop it downward to the floor and out.
Like the 2 pics below show, you just "pinch" the edges of the glove box towards each other:
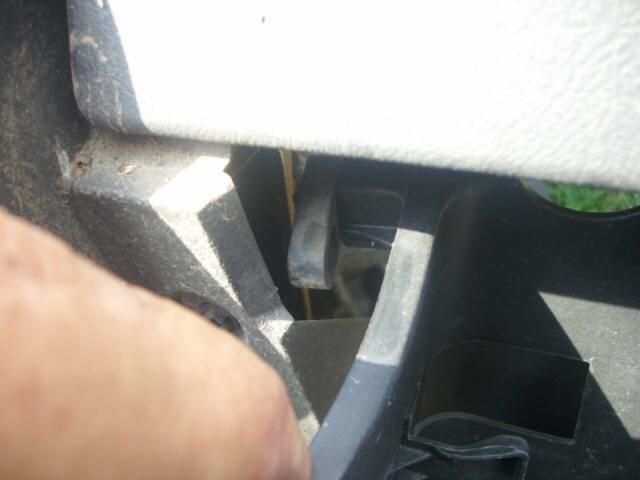
And then the next pic shows how the hinge just pulls apart:
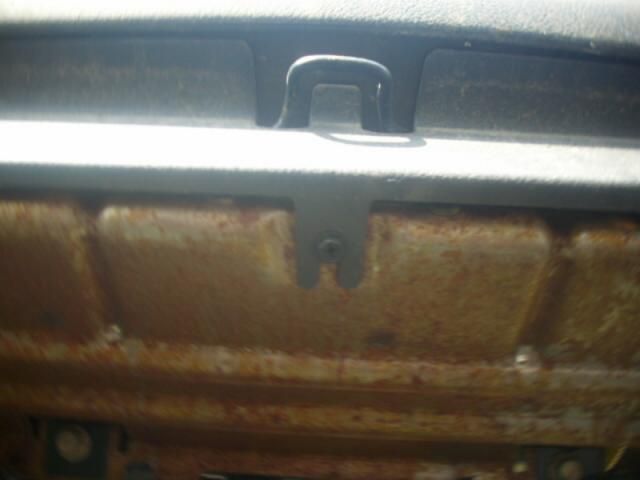
Now to REMOVE THE BOMB!
Looking at the latch, there is a strip surrounding it that's held in with 3 phillips screws, 2 on the face of the dash and 1 under the edge, go ahead and remove it.
Installed it looks like this:
Removed it looks like this:
Note the center tab, which can be missed:
Now remove the latch wire pictured here and note the 5 10mm bolts for the air bag housing assembly and remove them.
Their postition is shown in the pic below:
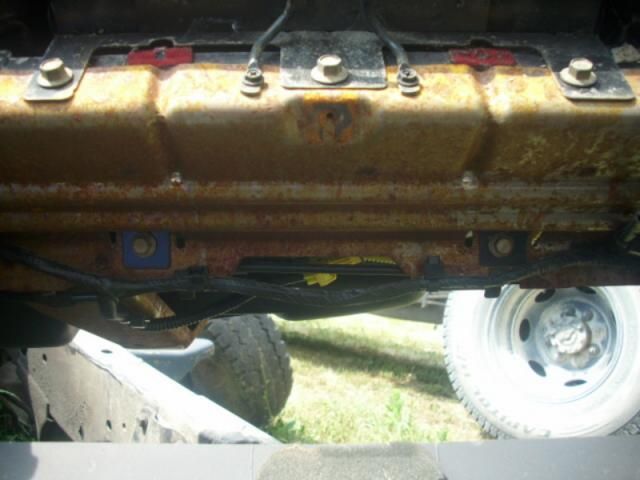
There are also 4 7mm/phillips screws that hold the air bag cover over the air bag assembly. These attach to the face of the steel structure, they are the 2 sets of 2 screws in the plastic at each end of this pic:
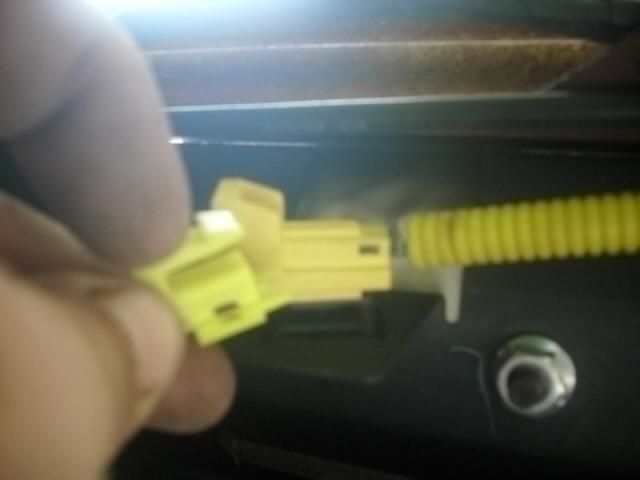
Once the bag is loose, slip under the dash and you should see something like this, which is the connector for the air bag:
The airbag has a lock on the connector which looks like this:
Once the wire is disconnected, it takes some tugging and coaxing, but the bag ends up coming out looking like this:
I then remove the console (or the auto equivalent) and take the lower dash support bolts OUT, not just "loose". These bolts are located near the ABS module. SORRY I DON'T HAVE PICS OF THIS STEP!
After that I remove all of the dash top face screws, of which MOST are shown in this series of pics:
Next to come out is the font dash mounting screws, the ones near the windshield, which are 8mm (or 5/16").
Here's pics of some places where they are located:
Once the dash is sitting loose, tip it back, then remove the passenger's side lower corner bolt and ease the dash partway towards the seat.
~~~~~~~~~~~~~~~~~~~~~~~~~~~~~~Continued Next Post~~~~~~~~~~~~~~~~~~~~~~~~~
__________________
If you or I did business like the PEOPLE in government do business, we'd be put in jail. Government is coercive.
Anarchy: The state of existence where there are no masters & no slaves. Therefore, Anarchy means the ABSENCE OF SLAVERY, or, in other words, FREEDOM.
|
|
|
|
|
07-21-2014, 02:14 PM
|
#3
|
Name: Mark Nixon
Title: No Savior among the flesh
Status: Not Here
Join Date: Feb 2009
Location: Brownville, Nebraska
Member`s Gallery
Posts: 8,676
|
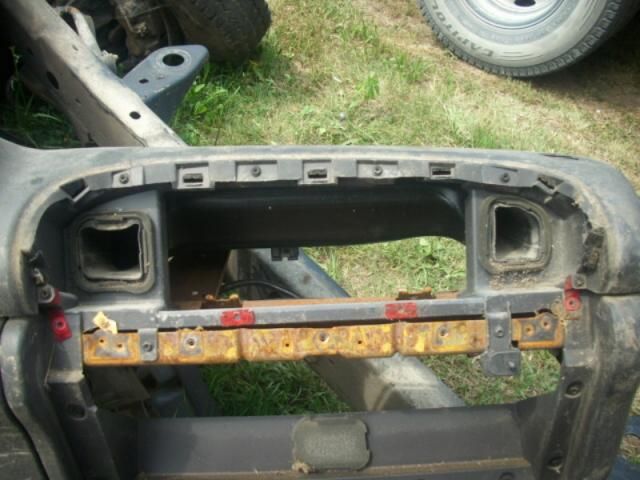
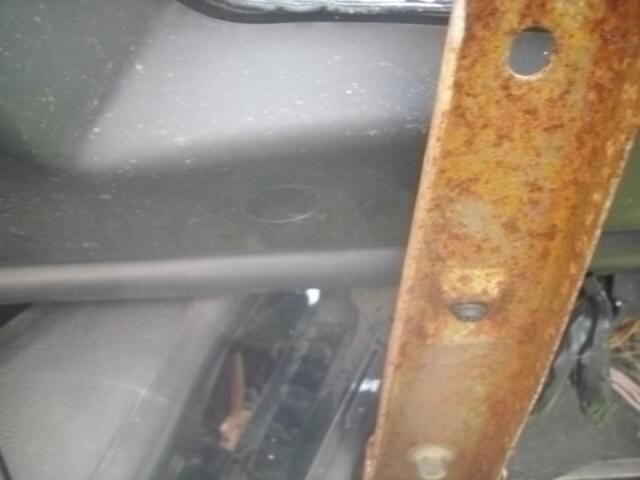
At this point the screws you want to remove are the ones that screw through the STEEL dash structure underneath, like this series of pics:

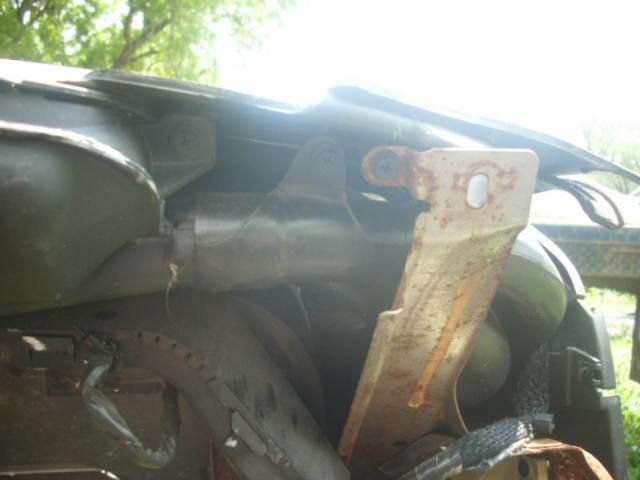
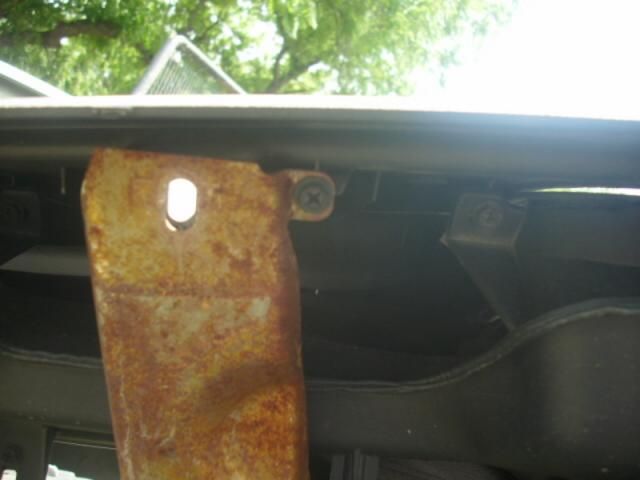
HINT look for the "fingers" at the tops of each of the steel structure supports, they are 4 of the 6 points where the top plastic itself attaches to the steel.
There are also 2 other points about mid-way down on the 2 CENTER structure supports. Pictured is one of those:
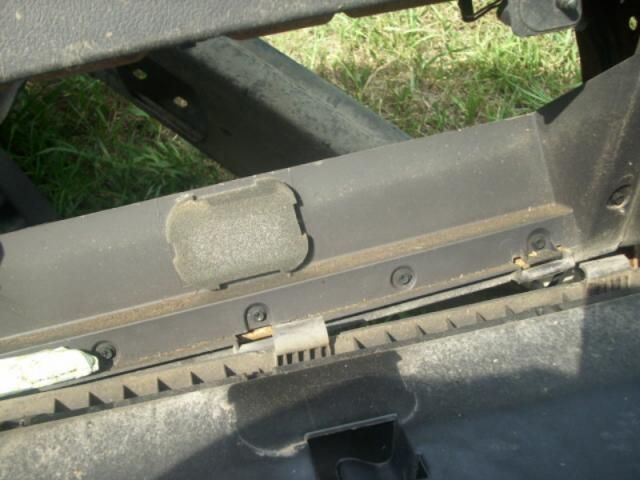
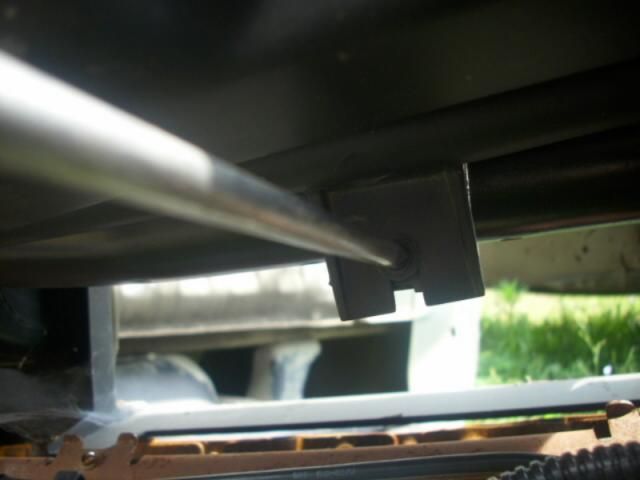
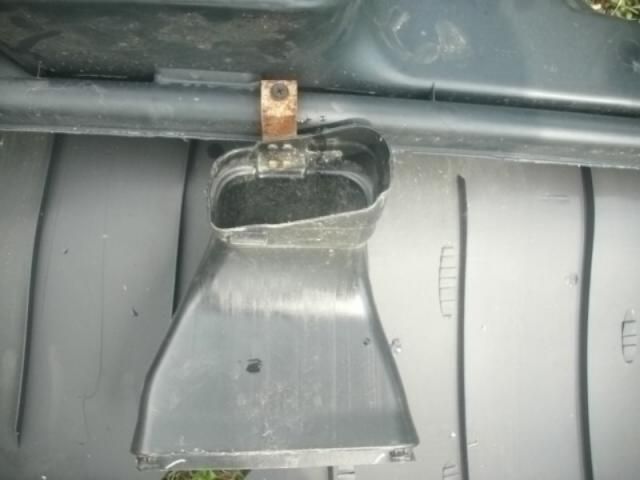
The only 2 screws that have anything to do with removing duct work are the one above the glove box, in the 1st pic below and the one that attaches the center duct to the dash top and both aren't hard to get at.
The 1st one just splits the A/C duct from the defroster duct.
The center duct can actually be removed and installed with the top, as pictured:
Don't forget the 2 screws by the doors, 1 on each dash end!!
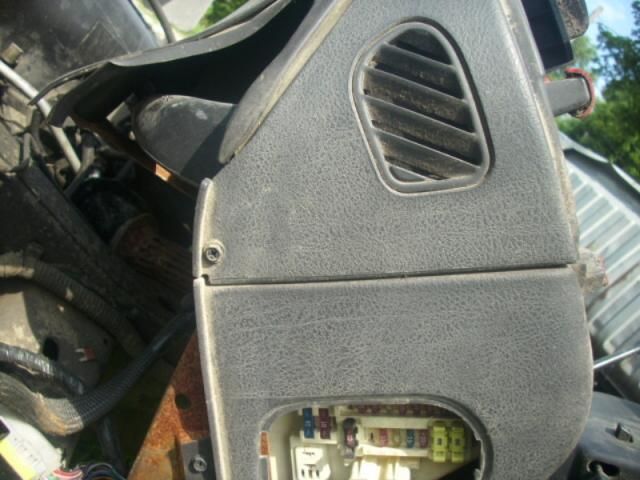
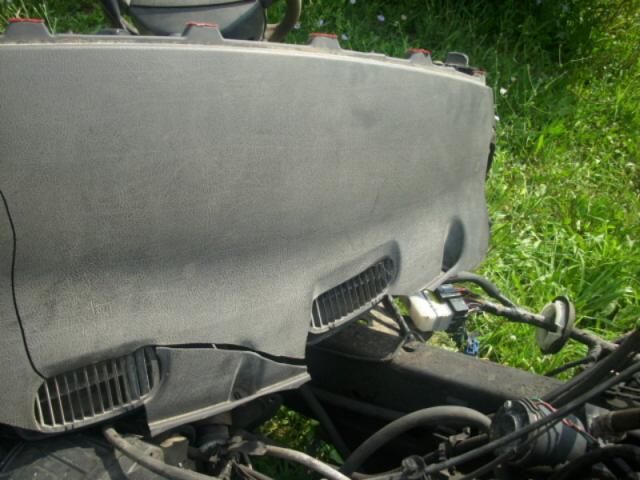
Lastly, but not on purpose, be sure to remove the headlight switch and fish out the wiring before attempting to lift out the dash top, as the wiring routes OVER the defroster ductwork:
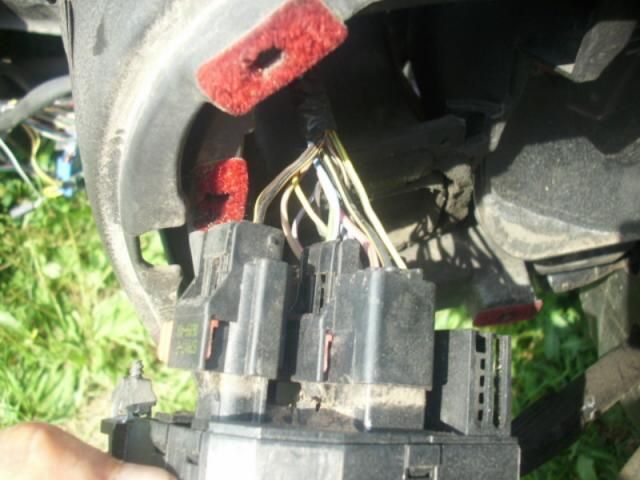
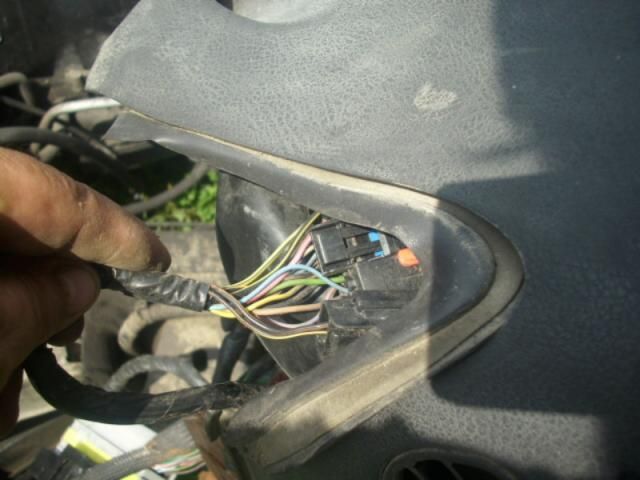
Doing it this way gets the top out and leaves the defroster duct work still attached, for ease of removal AND re-install.
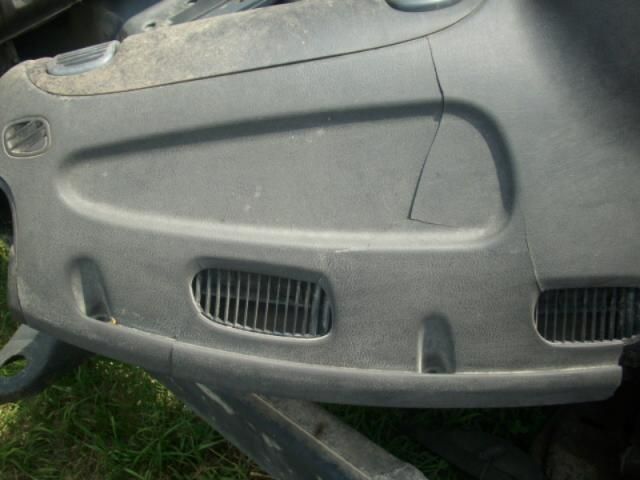
One thing that'll save some aggravation is to look at a dash top already out, or your new one, for guidance.
Understand that the difficulty is much higher because you are working around the 'A' pillars and seats, plus you'll have a windshield installed, BUT I do at least 1 or 2 of these a month in junkyards, I'm a short fat guy with lots 'O gut and short arms and I'd do 20 a month if they were not broken and worth pulling.
It's not hard work, just tedious.
Above all, Patience, Grasshopper, Patience.
Mark.
__________________
If you or I did business like the PEOPLE in government do business, we'd be put in jail. Government is coercive.
Anarchy: The state of existence where there are no masters & no slaves. Therefore, Anarchy means the ABSENCE OF SLAVERY, or, in other words, FREEDOM.
|
|
|
|
|
07-22-2014, 08:58 AM
|
#4
|
Name: Billysgoat
Title: The ANTI-BLING!
Status: Not Here
Join Date: Apr 2006
Location: Greenville, MS
Member`s Gallery
Posts: 10,694
|
Dash Removal How To
Since Mark was kind enough to share some expertise on replacing a dash pad, thought we would make it a sticky up here and easy to find.
__________________
Bringing The BEST Together
COMPETITIONDIESEL.COM
03 Dog, named Clifford, to heavy to be fast.
11 335D, the grin machine.
Quote:
Originally Posted by John Robinson

|
BTB,BBB
|
|
|
|
|
07-22-2014, 10:07 AM
|
#5
|
Name: diesel_importer
Title: Too Much Time
Status: Not Here
Join Date: Oct 2007
Location: Fairfield,TX
Member`s Gallery
Posts: 4,501
|
Mark, you are the man. Thanks!
__________________
01 QCSB 2WD AUTO: Redline/Smarty, Monster VP, 6x.013, S467 FMW, Goerend Trans, Caltracs.
Fuel only - 11.85 @ 114, 50 Shot - 11.58 @ 116 w/ 1.69 60'
|
|
|
|
|
07-24-2014, 08:12 AM
|
#6
|
Name: gulfcoastkustom
Title: Diesel Enthusiast
Status: Not Here
Join Date: Nov 2013
Location: Edgewood, NM
Member`s Gallery
Posts: 100
|
Nice write up! Thanks a lot. Any chance you want to sell the dash bezel from the pictures?
__________________
2000 QCSB, 4x4, NV5600, ppump'd 24v
2003 Excursion 6.0
1991 Land Cruiser FJ80 Cummins 4BT swap, NV4500
|
|
|
|
|
07-24-2014, 08:57 PM
|
#7
|
Name: sledshaker
Title: Too Much Time
Status: Not Here
Join Date: Jul 2009
Location: Millersburg, MO
Member`s Gallery
Posts: 920
|
Good info, thanks Mark.
__________________
Driving everything with wheels, and some things without.
|
|
|
|
|
07-26-2014, 03:55 PM
|
#8
|
Name: BigPapa
Title: Truckless
Status: Not Here
Join Date: Jan 2008
Location: Springfield, TN
Member`s Gallery
Posts: 5,041
|
Thanks Mark.
__________________
Scott
2003 Avalanche Z71
Common sense is like deodorant. The people that need it most never use it.
|
|
|
|
|
07-27-2014, 09:02 AM
|
#9
|
Name: Billysgoat
Title: The ANTI-BLING!
Status: Not Here
Join Date: Apr 2006
Location: Greenville, MS
Member`s Gallery
Posts: 10,694
|
After tackling mine yesterday, a few things to add, mainly on going back together.
I used the LMC unit, seems ok, fit is good, but the supplied screws suck balls, go buy some better ones or reuse the factory ones. Either way, when the dash pad is sitting out, go ahead and run a screw into each spot, trying to start and self tap those babies in the truck is a royal pain.
Give yourself time, it took me all day, I was also replacing the heater core and A/C evaporator though. Just replacing the dash pad would have been a few hours, but it's not a job you really want to rush.
Buy, beg, borrow or steal a 7mm hex that will fit on a driver handle, big help.
Other than that, Mark's instructions are spot on and I cannot say thank you enough to him, the pictures and the little tips were extremely helpful!
__________________
Bringing The BEST Together
COMPETITIONDIESEL.COM
03 Dog, named Clifford, to heavy to be fast.
11 335D, the grin machine.
Quote:
Originally Posted by John Robinson
|
BTB,BBB
|
|
|
|
|
07-29-2014, 08:38 PM
|
#10
|
Name: BigPapa
Title: Truckless
Status: Not Here
Join Date: Jan 2008
Location: Springfield, TN
Member`s Gallery
Posts: 5,041
|
My son and I tackled mine today. All I can say is, if it weren't for Mark's instructions, we would still be out there, my son would hate me, and I'd have absolutely no hair left. The duct work would've been the end of me.
Only problem is my ABS and Brake lights are coming on now. I'm fixing to go drive it some and see if I can figure out when they're coming on. Any hints on what I could've done?
Thanks Mark!
__________________
Scott
2003 Avalanche Z71
Common sense is like deodorant. The people that need it most never use it.
|
|
|
|
|
07-29-2014, 10:07 PM
|
#11
|
Name: CSnyder
Title: Snyder-Motorsports
Status: Not Here
Join Date: Mar 2008
Member`s Gallery
Posts: 6,278
|
Make sure the brake light switch bracket isn't bent and the e-brake is released 100%.
__________________
Alot of my life is easier thanks to Mumau Diesel! and Goerend Transmission
There is a HUGE difference between cocky and confident when it comes to engine building.
|
|
|
|
|
07-29-2014, 10:47 PM
|
#12
|
Name: BigPapa
Title: Truckless
Status: Not Here
Join Date: Jan 2008
Location: Springfield, TN
Member`s Gallery
Posts: 5,041
|
Thanks, I'll check those. I went out and drove it. I can drive 35 mph for miles, even hitting the brakes from time to time, and they won't come on. If I get around 38-40 they come on. Doesn't matter if I'm on the throttle, letting off, or hitting the brakes.
The only thing I did besides what was in Marks instructions was to remove the cluster. I removed the lens and cleaned the dust off the gauge faces and the inside of the lens.
__________________
Scott
2003 Avalanche Z71
Common sense is like deodorant. The people that need it most never use it.
|
|
|
|
|
07-30-2014, 08:40 AM
|
#13
|
Name: BigPapa
Title: Truckless
Status: Not Here
Join Date: Jan 2008
Location: Springfield, TN
Member`s Gallery
Posts: 5,041
|
Cruise doesn't work, either.
__________________
Scott
2003 Avalanche Z71
Common sense is like deodorant. The people that need it most never use it.
|
|
|
|
|
07-30-2014, 09:15 AM
|
#14
|
Name: Cozze44
Title: Junkman
Status: Not Here
Join Date: Feb 2012
Location: WIND GAP, PA
Member`s Gallery
Posts: 1,315
|
Quote:
Originally Posted by BigPapa
My son and I tackled mine today. All I can say is, if it weren't for Mark's instructions, we would still be out there, my son would hate me, and I'd have absolutely no hair left. The duct work would've been the end of me.
Only problem is my ABS and Brake lights are coming on now. I'm fixing to go drive it some and see if I can figure out when they're coming on. Any hints on what I could've done?
Thanks Mark!
|
Same thing happened to me, I havent tried it yet, but I have read that sometimes unplugging the brake light switch can kill it. If you look at the actual switch, it says right on it, Do not re-use. I'm gonna throw a new one in and see if it fixes it. Great write up btw Mark!
__________________
Frank
03 Subaru Forester - Old man car - 300k - RIP
07 Subaru Forester - Dadmobile - 129k
14 Subaru Legacy Outback - Wifes ride - 70k
02 Dodge 2500
My Build Thread
|
|
|
|
|
07-30-2014, 03:00 PM
|
#15
|
Name: BigPapa
Title: Truckless
Status: Not Here
Join Date: Jan 2008
Location: Springfield, TN
Member`s Gallery
Posts: 5,041
|
Brake light switch was unplugged...... 
Thanks for the help fellows.
__________________
Scott
2003 Avalanche Z71
Common sense is like deodorant. The people that need it most never use it.
|
|
|
|
 Posting Rules
|
You may not post new threads
You may not post replies
You may not post attachments
You may not edit your posts
HTML code is Off
|
|
|
All times are GMT -5. The time now is 10:11 PM.
|


