| Advertisement |
|
|
|
|
|
|
|
If this is your first visit, be sure to check out the FAQ by clicking the link above.
You may have to register before you can post: click the register link above to proceed.
To start viewing messages, select the forum that you want to visit from the selection below.
|
| Diesel Conversions Powerplant swaps, Repowers, etc. |
 12-21-2020, 05:13 AM
|
#21
|
Name: 06 DIESEL
Title: Dead Eye Firearms LLC
Status: Not Here
Join Date: Sep 2007
Location: Airville, PA
Member`s Gallery
Posts: 5,122
|
Quote:
Originally Posted by Flatbedcowboy

So the tanks look like they may pretty much be toast. I really want to use these as they are the original and the patina matches. New stainless ones would look terrible.
But since the tanks are steel, I may cut the ends off of them, sand blast the insides out and reweld the end caps back on. Maybe.... I dont need them right now so Ill worry about that later.
|
Quote:
Originally Posted by TheBac
Couldn't you use some kind of sealer/liner inside the old tanks?
|
They clean out tractor tanks that are as bad or worse all the time. Get you a handful of 3/8" nuts and throw them in the tank with some cleaner and find a way to turn the tank over automatically for an hour or so. Spray out that first batch and do it again. Eventually it will be clean and then you can reseal the tank with Por 15 tank sealer.
Most of the tractor guys strap the tank to one of the tractor tires on another tractor and start it and let it run at idle in low gear with the rear on jack stands. Like this
__________________
Travis
My rig - 2021 Mega 3500 SRW
My Classic - 79 Chevy Silverado
Quote:
Originally Posted by RonA
Trucks are like women. Sometimes you just need to spend money on them to keep them happy.
|
|
|
|
|
|
12-21-2020, 06:53 PM
|
#22
|
Name: Flatbedcowboy
Title: Green Behind the Ears
Status: Not Here
Join Date: Dec 2020
Member`s Gallery
Posts: 67
|
Quote:
Originally Posted by 06 DIESEL
They clean out tractor tanks that are as bad or worse all the time. Get you a handful of 3/8" nuts and throw them in the tank with some cleaner and find a way to turn the tank over automatically for an hour or so. Spray out that first batch and do it again. Eventually it will be clean and then you can reseal the tank with Por 15 tank sealer.
Most of the tractor guys strap the tank to one of the tractor tires on another tractor and start it and let it run at idle in low gear with the rear on jack stands. Like this |
Yea I have seen that to. They just seem really bad. I also need to get in there and get a few things cut out of there. The fill hole actually goes into a pipe the bends and runs to the back of the tank, and I dont want that, I want to be able to use the big nozzles at the truck stop.
I may try to clean them the way the video shows, but I may also cut the end off and sand blast in there.
|
|
|
|
|
12-21-2020, 07:03 PM
|
#23
|
Name: Flatbedcowboy
Title: Green Behind the Ears
Status: Not Here
Join Date: Dec 2020
Member`s Gallery
Posts: 67
|
Ive been working on getting the cab loose from the frame; Im not using the airlines, or wiring thats on there, so I spend alot of time hacking and cutting everything away from the firewall and underside.
All the airlines are actually copper, so thats weird. I was expecting them to be rubber.
I also took the floor pan out to see how the transmission ties in, and the pan is of course eaten up.


But instead of fixing them, my KB8 parts truck has pretty good ones, so Im going to use those instead.
|
|
|
|
|
12-21-2020, 07:07 PM
|
#24
|
Name: 12valve95
Title: Comp Diesel Sponsor
Status: Not Here
Join Date: Jan 2016
Location: Canton,OH
Member`s Gallery
Posts: 780
|
I am stoked for this thing man!
I love these style of trucks!
keep the updates coming!
__________________
Jim-cleandiesel88 on Insta
'95 RCLB: in pieces... 
1986 RC C30 Dually 12Valve...Coming soon
'17 HANDSHAKER : SOLD
|
|
|
|
|
12-21-2020, 07:08 PM
|
#25
|
Name: Flatbedcowboy
Title: Green Behind the Ears
Status: Not Here
Join Date: Dec 2020
Member`s Gallery
Posts: 67
|
Speaking of my KB8 here are some photos for your enjoyment:


I think this is ether a stop sign or a wide turn signal


It has a PARMA manure spreader on it, which was manufactured less than 20 miles from me.
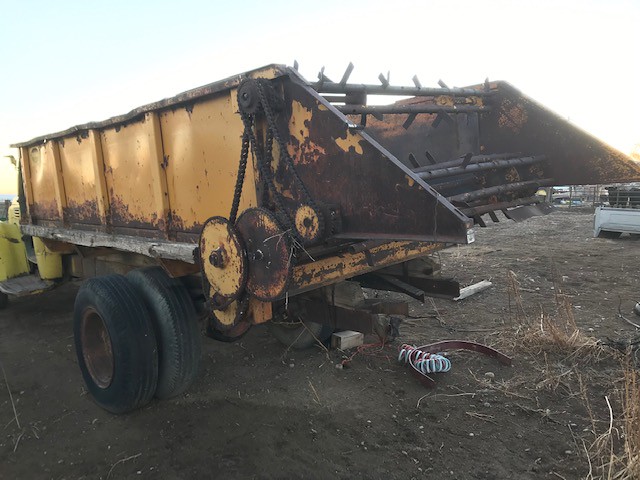
The door reads: 3719 Idaho Frozen Foods, Inc. Twin Falls, Idaho 25000

I guess since Im going to use parts off of this truck is should be included in the build cost:
Total cost into project so far: $1270
Last edited by Flatbedcowboy; 12-21-2020 at 07:12 PM.
|
|
|
|
|
12-28-2020, 12:06 PM
|
#26
|
Name: Flatbedcowboy
Title: Green Behind the Ears
Status: Not Here
Join Date: Dec 2020
Member`s Gallery
Posts: 67
|
Well its been hanging around 20-30 degrees the last few days so I haven't gotten much done, but I did get the cab off this week and got it into my barn.
I made a huge mistake though. This cab only bolts to the frame in 3 places. the frame mounts are one piece with a plate that that holds the cab mount bushing on and I got excited with the torch and cut that support. Now Ill have to scab the old one back together. Pretty annoying but not the end of the world.


|
|
|
|
|
12-28-2020, 12:13 PM
|
#27
|
Name: Flatbedcowboy
Title: Green Behind the Ears
Status: Not Here
Join Date: Dec 2020
Member`s Gallery
Posts: 67
|
Some interior pictures:

It looks like its going to cost around $300 to get the gauges rebuilt. They can run on 12v or 6v. Im not sure if I want to go with new modern gauges or use the original panel or not yet.


I believe this used to drop down when there wasnt enough air to run the brakes.

Last edited by Flatbedcowboy; 12-28-2020 at 12:15 PM.
|
|
|
|
|
12-28-2020, 01:49 PM
|
#28
|
Name: 12valve95
Title: Comp Diesel Sponsor
Status: Not Here
Join Date: Jan 2016
Location: Canton,OH
Member`s Gallery
Posts: 780
|
I vote restored original gauges.
And is that air warning mechanical?
__________________
Jim-cleandiesel88 on Insta
'95 RCLB: in pieces...
1986 RC C30 Dually 12Valve...Coming soon
'17 HANDSHAKER : SOLD
|
|
|
|
|
12-28-2020, 02:01 PM
|
#29
|
Name: Flatbedcowboy
Title: Green Behind the Ears
Status: Not Here
Join Date: Dec 2020
Member`s Gallery
Posts: 67
|
Quote:
Originally Posted by 12valve95
I vote restored original gauges.
And is that air warning mechanical?
|
Im leaning that way to, I need to call the restoration guy and make sure he can use the speedo cable from my spicer transmission. The dash has a hole for a tach already, that I can run off the alternator.
I think it stays closed with air pressure and drops down without it, the air lines run up through the pillar to it and it has like a 3 way valve on it. The lines then go down back down through the firewall to another 3 way valve that connected to the treadle valve and air tanks.
Since I will be going to hydro disk brakes, Ill be losing that little sign though.
|
|
|
|
|
12-28-2020, 02:36 PM
|
#30
|
Name: chevota84
Title: Too Much Time
Status: Not Here
Join Date: Jul 2009
Location: Prineville, OR
Member`s Gallery
Posts: 4,926
|
Wig wag flag, low air warning. They were in trucks into the 70's
Sent from my SM-G975U using Tapatalk
__________________
99 Dodge 2500 with stuff
|
|
|
|
|
12-28-2020, 03:56 PM
|
#31
|
Name: 12valve95
Title: Comp Diesel Sponsor
Status: Not Here
Join Date: Jan 2016
Location: Canton,OH
Member`s Gallery
Posts: 780
|
Quote:
Originally Posted by Flatbedcowboy
Im leaning that way to, I need to call the restoration guy and make sure he can use the speedo cable from my spicer transmission. The dash has a hole for a tach already, that I can run off the alternator.
I think it stays closed with air pressure and drops down without it, the air lines run up through the pillar to it and it has like a 3 way valve on it. The lines then go down back down through the firewall to another 3 way valve that connected to the treadle valve and air tanks.
Since I will be going to hydro disk brakes, Ill be losing that little sign though.
|
I want that flag if you throw it out, I may rig it up in my squarebody since I will have onboard air....things like that are just to damn neat to me....I geek out over mechanical solutions to problems.
__________________
Jim-cleandiesel88 on Insta
'95 RCLB: in pieces...
1986 RC C30 Dually 12Valve...Coming soon
'17 HANDSHAKER : SOLD
|
|
|
|
|
01-04-2021, 01:24 PM
|
#32
|
Name: Flatbedcowboy
Title: Green Behind the Ears
Status: Not Here
Join Date: Dec 2020
Member`s Gallery
Posts: 67
|
Well I had several days off for the holidays but I didnt get much done. I did get the engine pulled finally. This beast is heavy, Im thinking with the trans attached it was over 1400lbs.


This truck also come with a winter grille factory option. It uses a thermostat in the coolant line and air/vacuum to open and close.
Im not sure if Ill get to keep the grille though, because I want to put an intercooler and a/c condenser in there, and there isnt much room. I would also need to rig up some sort of actuator, because the one it has now is shot.


I have been spending alot of time measuring now that the engine is out. Depending on the intercooler I choose, I may be able to slide the engine forward an inch or so, and I would only have to message the firewall instead of doghousing it. I only need about an 1.5" I think.
Ive probably spent 12 hours searching for an intercooler to use. I only have 24" max width and 30" max height, including the inlet/outlet. Routing the piping will also be a trick to. I would like to find one that both inlet and outlet are on the top. It also needs around 900 square inches of core area to be around the same as what most DT466 use now.
I have been considering one out of a 6.4L powerstroke, the core area is correct, but it has the outlet on the drivers bottom (can make work) but the inlet is on the top-passenger side, facing the tire not the firewall. Plus they are plastic.
I think I have found an aluminum one, that I could cut the inlet and move it where I need, but its going to be a tight squeeze.
Last edited by Flatbedcowboy; 01-04-2021 at 01:32 PM.
|
|
|
|
|
01-18-2021, 11:26 AM
|
#33
|
Name: Flatbedcowboy
Title: Green Behind the Ears
Status: Not Here
Join Date: Dec 2020
Member`s Gallery
Posts: 67
|
Well nothing exciting has happened for the last couple weeks. Ive been welding all the holes on the firewall shut and working on the rotten floor piece. Ive only gotten a few hours a week in, so its taking forever.
I did find an intercooler though. Its out of a 2005 E350 6.0L van. Its slightly narrower than a fullsized truck one.
The reason I didnt go with a cheap aftermarket general install one, that you can get on ebay, is because I didnt want to have to use 90degree boots to get in and out of it, and they generally are really thick, somewhere from 3-5" thick and I dont have room for that.
Im going to have to modify the grille frame and take a chunk out of the cross-member, but itll work.
I paid more than I should, $200 but I was at the junk yard for 3 hours trying to find something and I wanted to get going.
Total cost into project so far: $1470
Last edited by Flatbedcowboy; 01-18-2021 at 11:28 AM.
|
|
|
|
|
02-10-2021, 10:24 AM
|
#34
|
Name: Flatbedcowboy
Title: Green Behind the Ears
Status: Not Here
Join Date: Dec 2020
Member`s Gallery
Posts: 67
|
Well its been a while since my last update, but this is what Ive been up to.
I was able to borrow a 110v welder with gas from a friend of mine, so I've been spending alot of time welding up all the holes in the firewall, cutting and fixing the floors that are rotted, and trying to make some brackets to hold my AC condenser and intercooler. Ill post pictures of all that later when Im closer to having that done.
On the weekends I have been focusing on the DT466.
I had a mobile mechanic I know come out and help me get it "bench" started. Turns out the turbo is shot, its been spraying oil into the intake for a while now, so we took the intake pipe off for now. I think Im going with an S366 or HX40 anyways so not a big deal.
After priming the pump, it started up in less than one turn and ran super great! It was holding oil pressure at idle great and sang nicely when we throttled it some. Its good to know the motor I chose is a good one!


It took me another weekend to get it separated from the R190 transmission, an older non-synchro 5 speed mated to a 3 speed auxiliary, but I was able to get it out by myself without breaking anything.

Then over the last few days I have been trying to get the fuel turned up, by backing the nuts off in the rear of the fuel pump. I just followed the youtube videos online; I had to modify two sockets to fit inside the pump, and I backed the two nuts out as far as I could. The nut that is closest to the inside also has like a thicker washer cast onto it, so I ground that off with a sander to get another 1/8th inch travel. I also turned the governor springs down a couple clicks, and turned the low idle fueling up 6 turns. Hopefully that gives me enough power to be happy at the moment.
The biggest question I have is about the clutch (its practically brand new), since the clutch was used with a non-synchro transmission can I use it with my synchronized Spicer 5spd? Or do I need to get a different clutch?
Cost of mobile mechanic $292 Total Cost into Project so far: $1762
|
|
|
|
|
03-08-2021, 01:01 PM
|
#35
|
Name: Flatbedcowboy
Title: Green Behind the Ears
Status: Not Here
Join Date: Dec 2020
Member`s Gallery
Posts: 67
|
Just a little update today.
I took my transmission to a retired trans mechanic I know and he said that everything looked great and it looked like it might have been rebuilt at some point, we took the PTO off and I will be selling that eventually. He donated a cover plate and also didn't charge me for the inspection, so that was pretty cool.
I also sold the 3speed auxiliary trans out of the '48 for $600.
Total Cost into the project so far: $1,162
Last edited by Flatbedcowboy; 03-08-2021 at 01:03 PM.
|
|
|
|
|
06-28-2021, 02:55 PM
|
#36
|
Name: Flatbedcowboy
Title: Green Behind the Ears
Status: Not Here
Join Date: Dec 2020
Member`s Gallery
Posts: 67
|
Well its been a while since I have uploaded anything; but here is a few updates:
I got my transmission mated to the DT466 (Im using a Spicer 5speed synchro) and tried setting the engine in the bay. Originally I thought that I would be able to mount it in the same place as the old engine, using the front cross member, but that makes the engine sit to high up, and it touches the hood.


So I cut a notch down in the crossmember, and I had to add a plate to get the engine to sit back away from the radiator. Im using the engine fan and not going electric. I have the engine sitting about 3degrees downward angle.
But even that proved to high, as the transmission hits the bottom of the cab, and I dont want to have a trans tunnel; there's no foot room as is and a tunnel would shrink that even more.
So I ended up cutting the original front crossmember in half, as I need it to support the radiator and grille shell. In order to use the front engine mount out of my S1754 parts truck, I now have to box the front of the frame and drill some new holes in the mount. But mocking the engine and trans up, it fits way better that way anyways. The transmission goes completely under the cab, and the oil pan has 3-4" above and 4-5" behind the axle, which I think is plenty. More pictures of boxing the frame and mounting the front engine mount to come.
While I had the engine in the mocked position (held by jacks), I also was able to cut the doghouse opening out of the cab. I think the engine is going to sit 5" inside the cab, but even with the doghouse itll still be under the dash a good amount. Just a little less foot room, the go pedal may have to sit kinda weird with the doghouse.

That's pretty much all I have gotten done in the past months.
|
|
|
|
|
06-28-2021, 03:23 PM
|
#37
|
Name: Flatbedcowboy
Title: Green Behind the Ears
Status: Not Here
Join Date: Dec 2020
Member`s Gallery
Posts: 67
|
I have been struggling with the front axle for a little while now, though.
I originally bought a S1754 International to use the axles off of, but the front axle is like 10" wider than on my '48, which would make the tires set outside the fenders by like 3-4" each. Even with heavy offset rims I think it would look odd.
I've been trying to find if I can get my S1754 axle narrowed but there is ALOT of misinformation online. The axle is a cast steel axle, which should be weldable right? I've searched all over the internet, but there is so much misinformation out there is ridiculous. Also finding a shop to narrow it, is going to be a feat in my area as well, due to the liability I'm guessing.
So I bought an F550 chassis, complete with the steering box and power brakes. ($600) I like the idea of the steering box being on the inside of the frame, and the tighter turn radius over the S1754. But I would have to still narrow that axle, draglinks, and track bar, plus buy adaptors to run 22.5" semi rims. Then its figuring out how to make my powersteering pump and power brakes play nice with the F550 front axle and medium duty rear axle.
But I think I really jumped the gun by buying the chassis as I think I need to find a medium duty truck axle, plus that'll give me a 10,000lb front axle instead of a 6,000.
If I cant weld on a cast steel axle, Hendrickson makes a fabricated one, and I think they started putting them on medium and heavy duty trucks in 2011. They are on the expensive side still and I haven't run across any with hydraulic disk brakes, mainly air disk. This axle would also need narrowed, but I know for sure they can be welded and plated. They also have ones that are already air-bagged and have shocks, which I would want to do eventually anyways, its just the upfront cost.
Any thoughts?
|
|
|
|
|
06-28-2021, 07:44 PM
|
#38
|
Name: Tobin
Title: 5.7 IDI Powaa!
Status: Not Here
Join Date: Oct 2008
Location: Oviedo, FL
Member`s Gallery
Posts: 1,505
|
Cast steel is easily weldable.
__________________
2006 Dodge 2500 QCLB 4x4 Goerend 48RE
1977 F250 RCLB 4x4 "High Boy" 12 valve, 180 pump, 5x.014, S363/S475, Goerend 47RH, NP271, 2007 D60/Sterling 10.5, 40" Toyo MTs
|
|
|
|
|
07-21-2021, 12:38 PM
|
#39
|
Name: Flatbedcowboy
Title: Green Behind the Ears
Status: Not Here
Join Date: Dec 2020
Member`s Gallery
Posts: 67
|
Quote:
Originally Posted by Tobin
Cast steel is easily weldable.
|
Thats what I have always thought, but you google "welding an I beam axle" and the whole internet is confused.
Now I just need to find a shop that will do it for me, maybe a frame shop would? There arent any racing shops near me, I dont know if there is even fab shops, just the local agriculture welder guys. And I not doing it myself thats for sure.
|
|
|
|
|
07-23-2021, 05:58 AM
|
#40
|
Name: Tobin
Title: 5.7 IDI Powaa!
Status: Not Here
Join Date: Oct 2008
Location: Oviedo, FL
Member`s Gallery
Posts: 1,505
|
Here is a Cast Steel piece I recently welded, TIG with 70S. Nothing special, could easily have used stick or MIG too.

__________________
2006 Dodge 2500 QCLB 4x4 Goerend 48RE
1977 F250 RCLB 4x4 "High Boy" 12 valve, 180 pump, 5x.014, S363/S475, Goerend 47RH, NP271, 2007 D60/Sterling 10.5, 40" Toyo MTs
|
|
|
|
 Posting Rules
|
You may not post new threads
You may not post replies
You may not post attachments
You may not edit your posts
HTML code is Off
|
|
|
All times are GMT -5. The time now is 01:11 PM.
|


