Building a shop

I'm not a fan of the ceiling joist being turned 90 deg. That looks like a saggy sheet rock mess waiting to happen.

1c8bd3ecafa5ff3cb130cfef4100238a.jpg


2nd floor ceiling will have wood paneling instead of sheet rock. Less weight on the 1x4’s attached to the purlins.
I was going to wood panel the entire place but it’s around $15 a sheet. Drywall is much cheaper, almost quicker, but will look 100x nicer than ok’ wood paneling. It should take a drywall crew less than a day to hang, tape, and float.
 
Wiring and plumbing. Taught my fiancé how strip wires on romex. We pulled all wiring, she’s stripping insulation and tucking everything in the box while I staple.
9661f4d74688319eb90de71cc710d55a.jpg


The two mini splits arrived. Bought these off amazon per my buddy who recommended them. That’s all he buys for house remodels when they need to cool one room or a game room.
Hope to mount and run plumbing for them this weekend.
d959f65e7e3095a23a89cc11f0b46aac.jpg
 
Jory would strip romex with that...

Looking good nick. Code on stapling is withing 12" of every box, and every 4.5'. Forgot to tell you that other day.
 
You would be impressed by how many people do that and knick a wire when they snip jacket....makes trouble shooting a blast....
 
Blew the building out really good with the yard blower. Vacuumed up all the dust and shavings just to start boring holes for AC lines.
One evaporator mounted, one to go. Not bad once you figure everything out. The instructions are very intuitive and in English.
Instructions do state to pull a vacuum on the low side before opening the valve for Freon. Had to buy a 410a hose and mini split adaptor for my 134a gauges to work.

780269ea2f126e1c88e1ba1ec70b0f9e.jpg


9f62c0ac463b98e013996ad3eba391d8.jpg


868346ea376b93c11a2d7a0598949d5b.jpg
 
Been 13 years and the outside door finally rotted to the point of getting me off my butt. The first install I had it on the outside of the opening. That was a huge mistake. The door is now moved to the inside stud wall like it should be. I'm going to order a glass storm door to mount on the outside of the opening. This will serve two fold. One, it will keep the rain off the new door, seals, jambs, etc. And two, it will give us some dead air to help insulate between the outside and inside. The new set up should work much better than the first. Dang metal building door openings are not framed the same size and normal dwelling doors so I had to build some trim. Really happy with the result.

Floor started to rot from the leaked water. Had to remove all the flooring that we made from rough cut lumber. Going back with vinyl plank.

attachment.php


Really damn nasty under there. When I removed the door, the threshold plate just fell off it.

attachment.php


Went back with a 1x12 ripped to 9" to span between stud wall and framed opening. This will allow the storm door to mount to the metal and not the wood. That should keep the rain and snow off the wood completely.

attachment.php


Tuned out nicely. Just need to fill screw holes, paint, and order a storm door.

attachment.php
 

Attachments

  • IMG_8038.jpg
    IMG_8038.jpg
    301.4 KB · Views: 0
  • IMG_8052.jpg
    IMG_8052.jpg
    219.5 KB · Views: 0
  • IMG_8054.jpg
    IMG_8054.jpg
    155 KB · Views: 0
  • IMG_8064.jpg
    IMG_8064.jpg
    132.2 KB · Views: 0
AC’s complete. Battled the 2ndfloor evaporator drain.
7be9ff9e205306259c5a62d0edfaab65.jpg


Heater hose and barb fittings for a fix.
4cab0d249f34c4335fb95162c66853c4.jpg


Main sewer vent on 2nd floor. Only one penetration for vents.
7e7a3e32b53ce62e5f687c4bf544e160.jpg


Insulation and drywall happening this week.
 
A heat gun will turn PVC into spaghetti if you haven't done that before. Go slow and don't over heat it but it will make those transitions much easier. $.02
 
I purposely didn’t post pictures of my heat gun plumbing solutions. Knowing all the OCD folks would have a smart remark.
But you’re right, it works very well. I’ve made a few 3/4” traps that way.


Never built a kitchen cabinet in my life, time to learn how being that’s the next major step.
 
Never built a kitchen cabinet in my life, time to learn how being that’s the next major step.

Alright then. I can tell you how we did ours. Like you, it was a first, and building one was fun. Building the other 18 sucks. It gets old fast. My advice is to find an extra day or two of job somewhere then go to Lowe's and buy them. :D

attachment.php


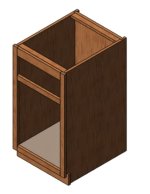
So starting out, we built the main box out of cabinet grade plywood. Cut a toe relief out of the bottom buy cutting a notch. I like to use a dado head on a table saw so that the back and bottom pieces slide in. That holds it straight and square, but not required. Glue and finish nail it together. Notice in the picture how the back is inset from the wall since it runs in a dado on the side pieces. If your walls aren't perfectly flat, then this relief lets you push the cabinets up to the wall without rocking back and forth. Research how tall you want your counter top to be before you start. Everyone is a different height and build them so they are comfortable to you and yours. Visit friends and measure their junk. :D

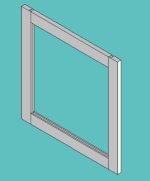
Then build the face. We used precut style boards. Miter saw them to length. We then used a biscuit jointer to put them together with glue and clamps. Once dry, finish nail them to the box using glue and clamps.

Cut a toe board if it is a stand alone cabinet, or wait until they are all put in place next to each other and run one toe board across multiples to tie them together.

Be sure to put a board across the front and back at the top for your counter top to screw down to. Screws will come up from the bottom so you can also predrill them with a countersink bit if you want.

attachment.php


Next, we used a rail and style router bit set from Lowe's (like $100) to make the cabinet doors. This gives you a dado on the inside edge for whatever you want in the middle to fit into. You don't have to go this fancy but it is worth the bit cost since the groves will hold them together nice and square when you glue and clamp them.

I know a schit ton more about woodworking than I know about being a diesel mechanic feel free to holler anytime.

attachment.php


Your drawer slide selection will determine how you build your drawers. The ones we used were simple to use. Build your drawers with a 3/4 thick face panel and then dado your drawer together. We used 1/2 ply on ours.

attachment.php


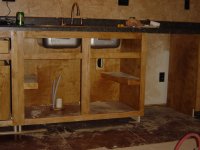
Remember, you can't put a drawer in front of your kitchen sink. They make little flip out deals for brushes but we just covered ours solid.

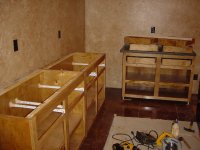
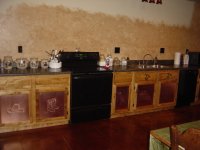
Funny how I can't find any pics of them completed with the top cabinets as well. Here is the bottoms mounted.

attachment.php
 

Attachments

  • Capture1.JPG
    Capture1.JPG
    33.9 KB · Views: 0
  • Capture2.JPG
    Capture2.JPG
    17.8 KB · Views: 0
  • DSC01880.jpg
    DSC01880.jpg
    348 KB · Views: 0
  • DSC01881.jpg
    DSC01881.jpg
    282.2 KB · Views: 0
  • DSC02225.jpg
    DSC02225.jpg
    268.2 KB · Views: 0
Thank you Jory. Very helpful guidelines to follow. We will probably build the lowers for our kitchen area and buy the uppers. I like how you offset the back panels to account for an imperfect wall. Good trick. Thinking I’ll make the faces out of 5/8” BC and same for the doors. Won’t go as fancy as yours. We will be on here 1.5 years, so I’m planning for 3.5 years.

Just bought an old 80’s era (Back when Sears made good tools) Craftsman chop saw with stand, Craftsman belt sander with stand, and a 1hp Craftsman hand router. I taught my fiancé how to use it and she’s been routing door hinges as I lay them out. It’s the same router my dad has and used to build their house. It’s raw power! Tim Alan would be proud.
 
Insulators came Thursday.
b6799411c6f5c45946b2469a782fe20e.jpg


878907ca805eaebbf65b0de1f949b05a.jpg


Drywall hung Friday.
b6d7a16409cf16dd097c07d076441164.jpg


2bc4c943a73da05299b7fc18145208fd.jpg


Tape and float Saturday.
09753b7b823e9215f3a205ae8d79e764.jpg


2396111b62f300dfdfc6409f2cdd7deb.jpg


It was a family of 3 brothers and their dad. Man those guys can move! Those are two jobs I’m glad to have contracted out.

Sand Monday and I’ll start painting Tuesday.
 
Back
Top