| Advertisement |
|
|
|
|
|
|
|
If this is your first visit, be sure to check out the FAQ by clicking the link above.
You may have to register before you can post: click the register link above to proceed.
To start viewing messages, select the forum that you want to visit from the selection below.
|
| Dodge Competition and Performance General Dodge Competition and Performance Discussion |
 04-09-2014, 10:05 AM
|
#41
|
Name: diesel_importer
Title: Too Much Time
Status: Not Here
Join Date: Oct 2007
Location: Fairfield,TX
Member`s Gallery
Posts: 4,501
|
BIG BLUE, if you ever come to Texas, I'm not gonna buy you A beer. I'm buying you a whole dame case!!! Thanks for these threads, I can't imagine how many people this will help in the next few years. How much difference is this compared to a 47re?
__________________
01 QCSB 2WD AUTO: Redline/Smarty, Monster VP, 6x.013, S467 FMW, Goerend Trans, Caltracs.
Fuel only - 11.85 @ 114, 50 Shot - 11.58 @ 116 w/ 1.69 60'
|
|
|
|
|
04-09-2014, 12:07 PM
|
#42
|
Name: murphy41
Title: Too Much Time
Status: Not Here
Join Date: Jan 2009
Location: Utah
Member`s Gallery
Posts: 1,624
|
Quote:
Originally Posted by Big Blue24

Ive had trouble with the Borg Solenoid on my high 180+psi line pressure transmissions. Decided to try something new. Time will tell if the 4L60E solenoid is better.
|
The DNJ solenoid is night and day better than the cheap Borg Warner "upgrade" if you wanna call it that. The DNJ in my trans has been in for almost 4 years and has never given me a lick of problems. And my trans is at the 200psi mark or above. Been awhile since I put a guage on it though.
__________________
Brandon
1997 2WD
Engineered Diesel
Manning Motorsports
Outlaw Diesel Performance (Utah)
AT Performance Diesel
|
|
|
|
|
04-09-2014, 03:10 PM
|
#43
|
Name: ahale2772
Title: Too Much Time
Status: Not Here
Join Date: Oct 2011
Member`s Gallery
Posts: 2,442
|
good stuff!
__________________
94 SCLB dually 11.3@122
|
|
|
|
|
04-09-2014, 06:06 PM
|
#44
|
Name: JakeDiesel
Title: Too Much Time
Status: Not Here
Join Date: Jan 2009
Member`s Gallery
Posts: 415
|
Awesome write up.
|
|
|
|
|
04-09-2014, 08:16 PM
|
#45
|
Name: Red Sleeper
Title: Too Much Time
Status: Not Here
Join Date: Aug 2009
Location: Lone Star State
Member`s Gallery
Posts: 4,595
|
Quote:
Originally Posted by Big Blue24
Ive had trouble with the Borg Solenoid on my high 180+psi line pressure transmissions. Decided to try something new. Time will tell if the 4L60E solenoid is better.
|
Interesting. I'm curious to see the outcome as well..
I installed the 2nd gear super hold servo kit and accumulator piston kit from Sonnax when I rebuilt mine. (the red anodized ones) I already had the DNJ in the trans from previous issues prior to rebuild. Well with all 3 combined line pressure spiked when 2nd gear hit and snapped my new (cheaper) band. I installed factory gov press. solenoid along with new brog warner band and it drives fine.
After reading post 22, I now understand why this happened.
Thank you. I owe you a 
__________________
Nick J
'14 Silverado LTZ 5.3 4wd
'05 Cummins QCSB 4wd 48re
'91 Cummins w350 5spd
|
|
|
|
|
04-10-2014, 08:15 AM
|
#46
|
Name: akadiesel
Title: Diesel by birth
Status: Not Here
Join Date: Dec 2009
Member`s Gallery
Posts: 169
|
Quote:
Originally Posted by JakeDiesel
Awesome write up.
|
As always! Not that it's needed on this build, but here's a link to a good, cheap{you do like cheap??} fix for the Valve Body Linkage Pivot Wear that many of our valve bodies need. http://www.sonnax.com/articles/202-C...age-Pivot-Wear
__________________
CUMMINS--the smoker's choice
BADiesel--the smoker's edge
'87 f800 Marmon Herrington 4x4, P-pumped, twinned, 5.9 Cummins beast on 48s
'93 extend cab Dodge Cummins twinned, p-pumper
'99 & '01 Dodge Cummins DDs
|
|
|
|
|
04-10-2014, 12:29 PM
|
#47
|
Name: Big Blue24
Title: Comp Diesel Sponsor
Status: Not Here
Join Date: Jan 2008
Location: Cedar City, UT
Member`s Gallery
Posts: 6,310
|
__________________
95' 2wd Junker Drag Truck
1502 HP Fuel-Only 12mm P7100 Pump
SXE 472 over GTX55 116mm 
OEM 12v Block 
Last edited by Big Blue24; 04-10-2014 at 12:35 PM.
|
|
|
|
|
04-10-2014, 12:58 PM
|
#48
|
Name: Big Blue24
Title: Comp Diesel Sponsor
Status: Not Here
Join Date: Jan 2008
Location: Cedar City, UT
Member`s Gallery
Posts: 6,310
|
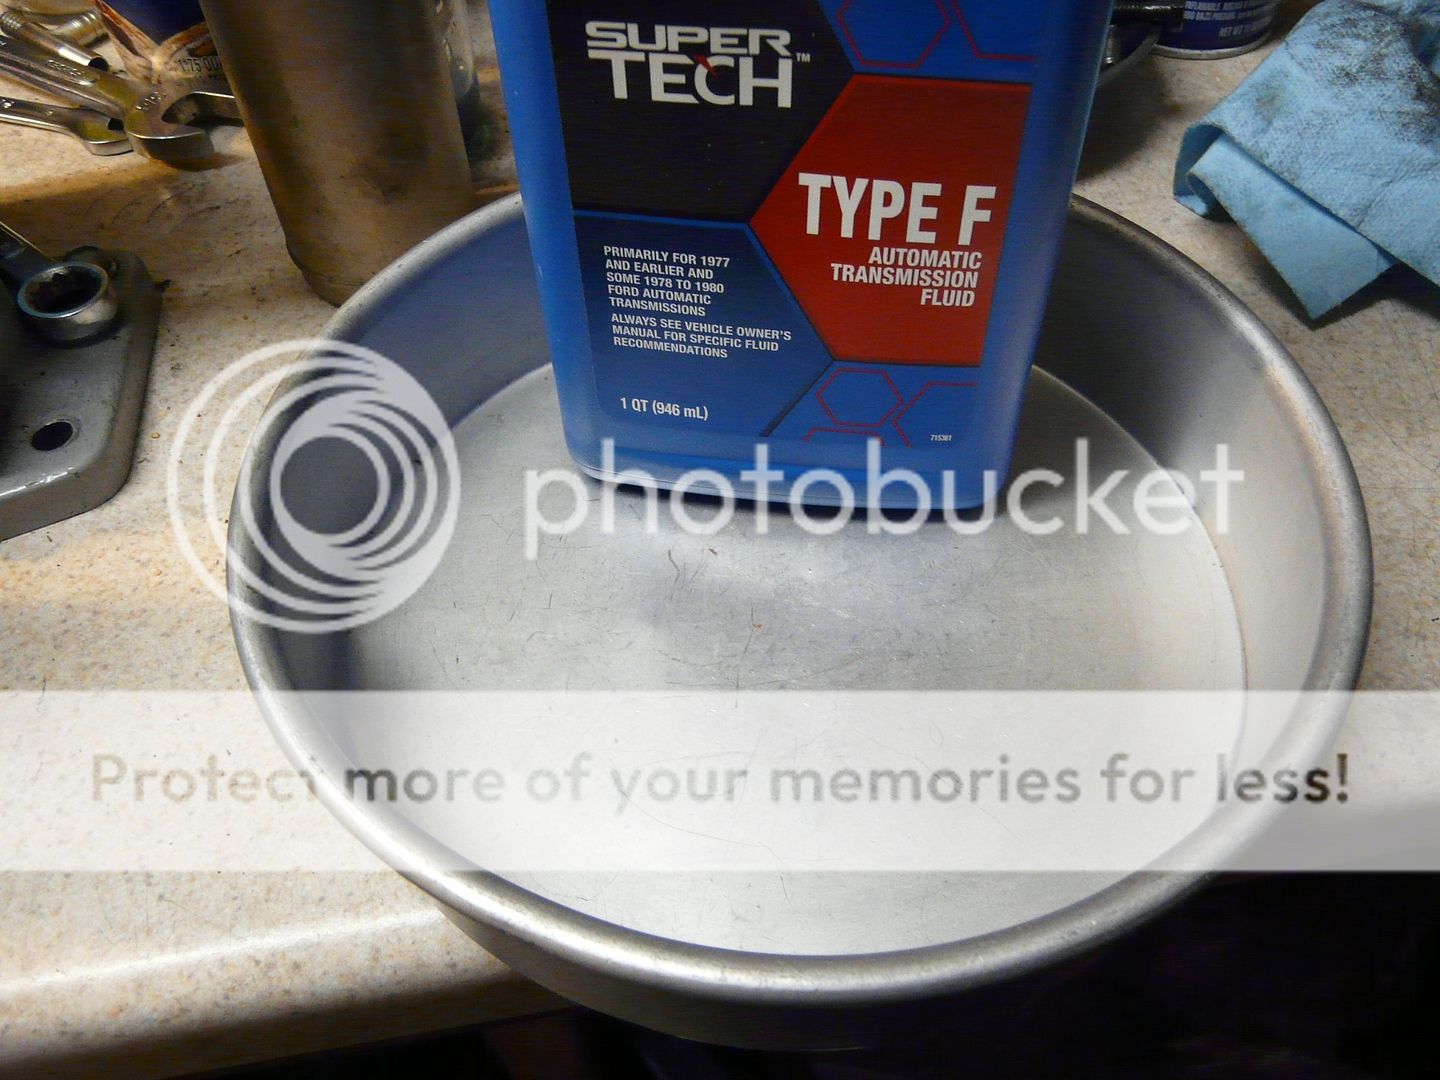
For the next steps, you'll need a cake pan full of ATF to soak clutches, bearings, etc.
New overdrive bearing presoak in ATF:

I like this assembly grease/lube for hot Vegas weather when assembling trans parts, Vasoline or Petroleum Jelly will work fine in colder climates:


New Overdrive Sprag:

Lubed:

Ready to install with new bearing in-place, fresh out of the ATF bath:


Installed, it's easiest to lower the assembly into the case using large snap ring pliers expanded into the center splined portion.
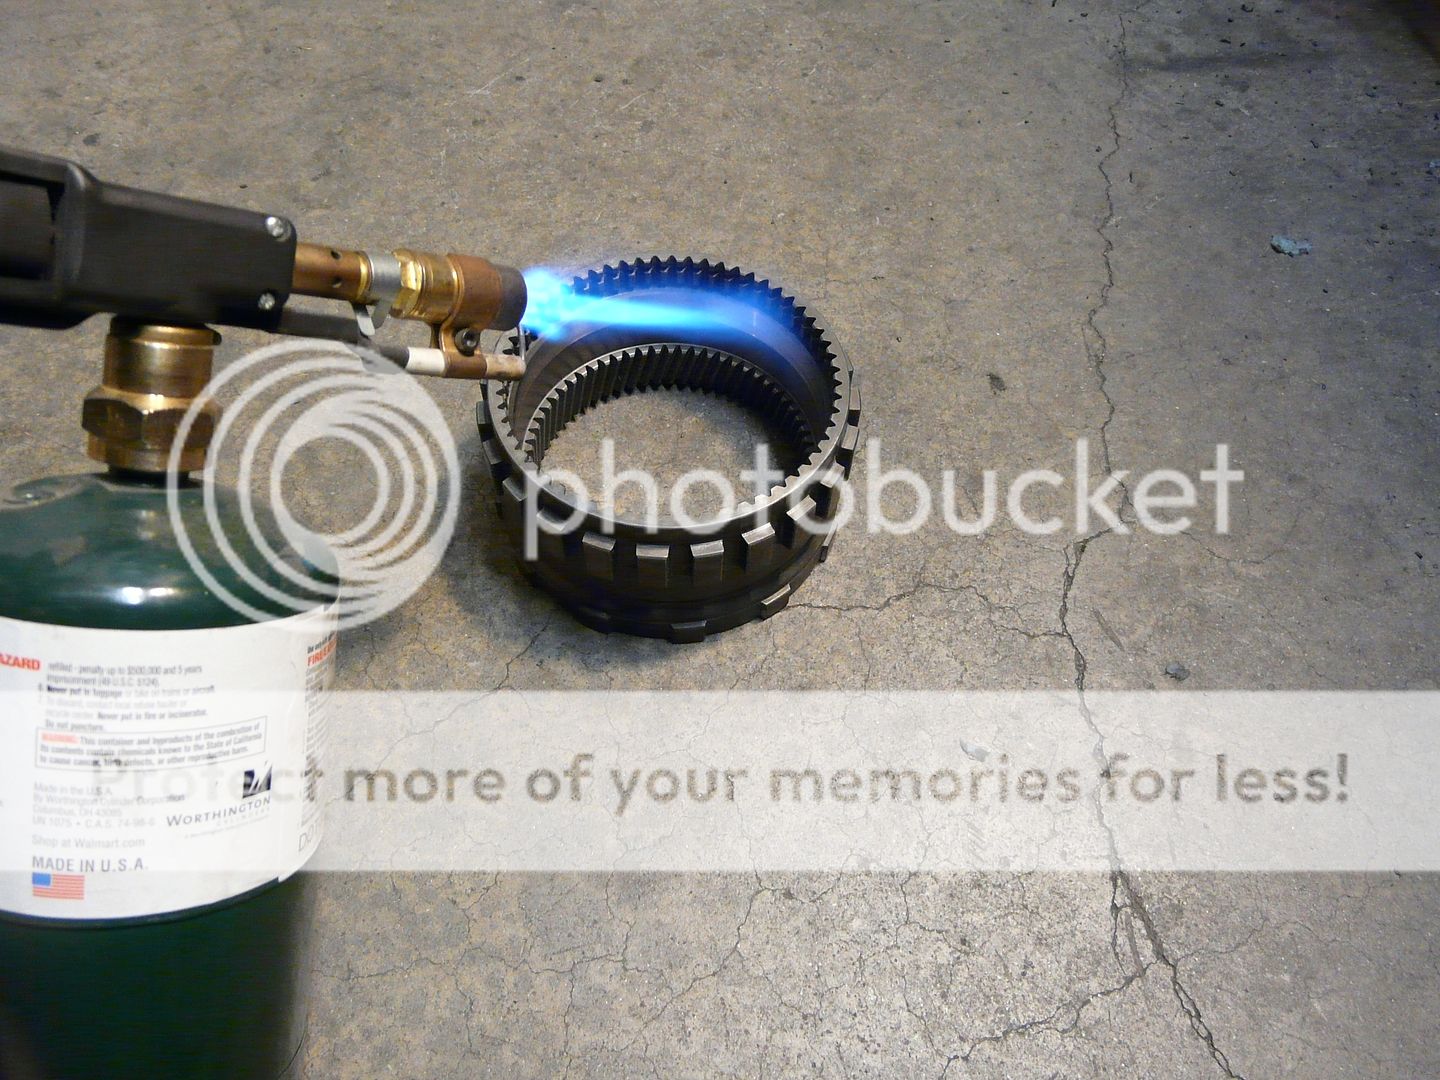
Next the stock (6) pinion overdrive planet drop down with a little pre-lube on the spur gears, 47rh & re transmissions came stock with a (5) pinion overdrive planet.


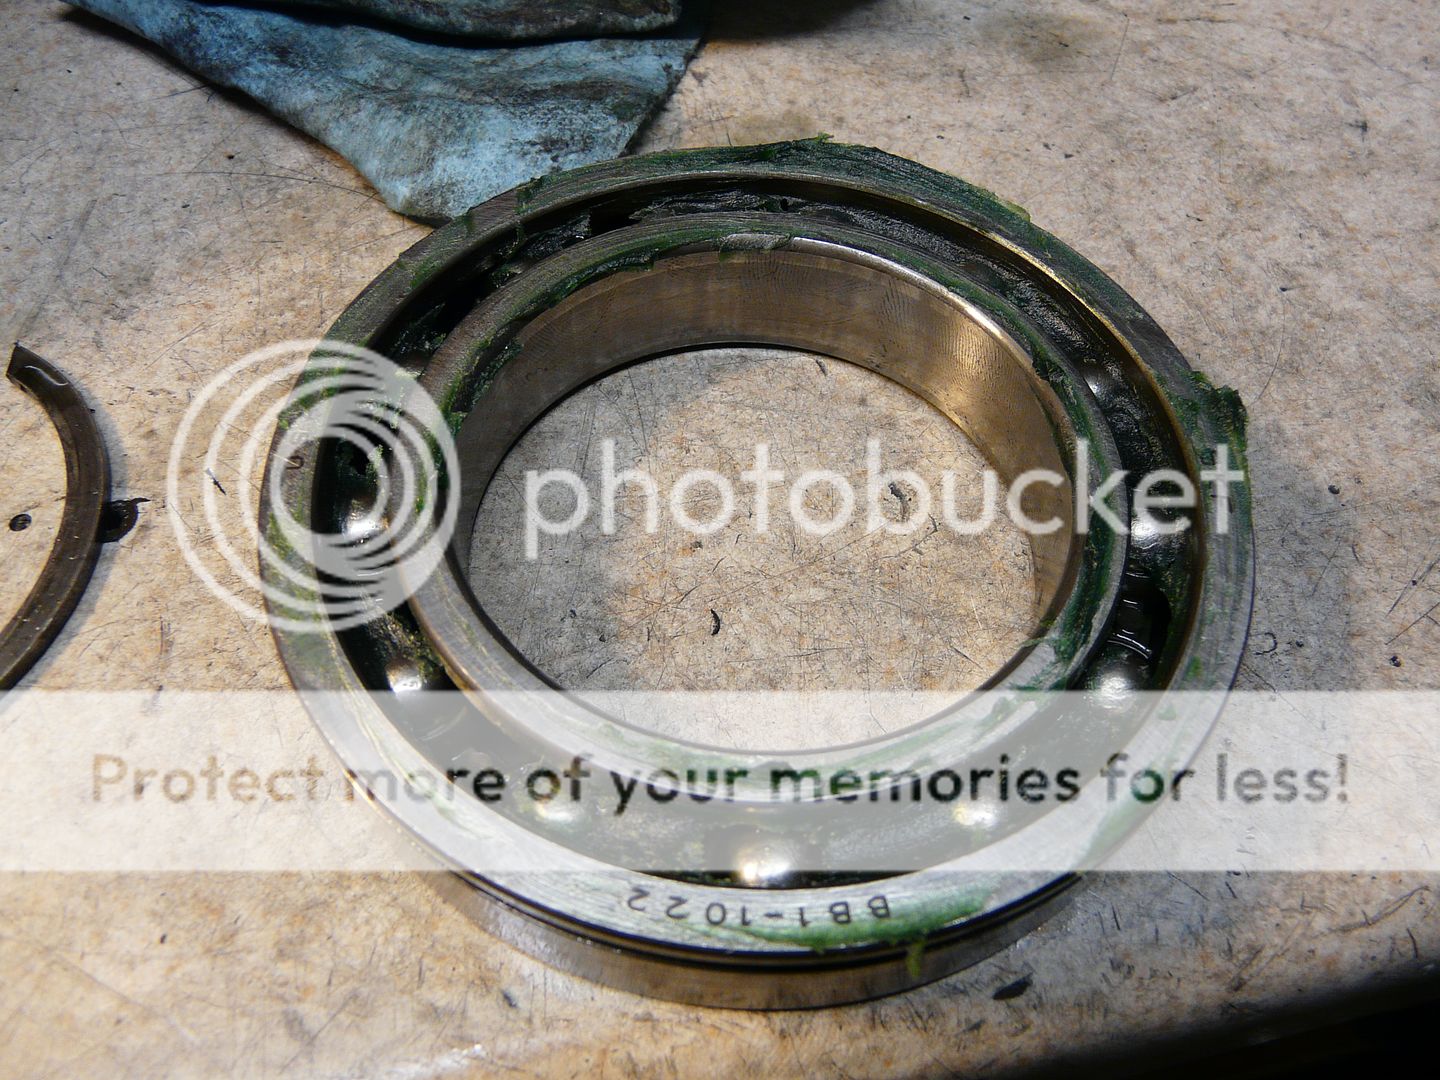
Next replace the bearing and race on the overdrive sun gear assembly:

The bearing kit came with both a new bearing and a race:

Remove (1) snap ring to remove and replace the race, otherwise just replace the bearing if the race is going to be reused. All pre-lubed and ready to install:


Install the large overdrive direct spring on the bearing race:


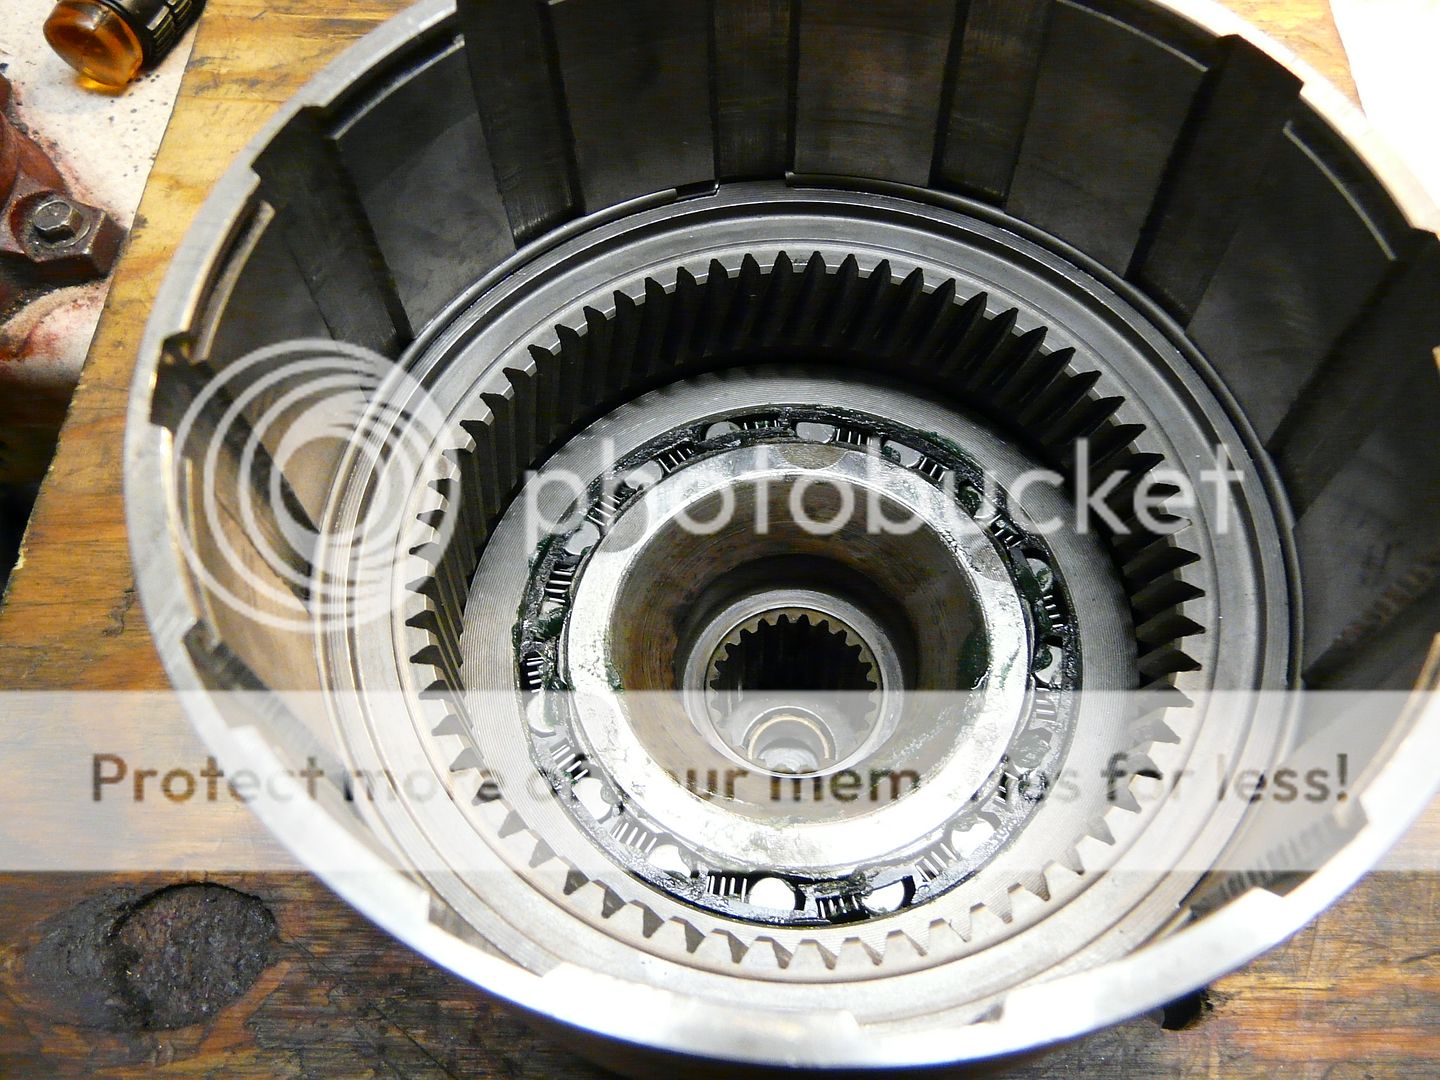
Install the lower reaction plate over the splined hub and start installing the pre-soaked overdrive/direct clutches and steels, (10) clutches in this pack:


Stock upper reaction plate, notice snap ring groove faces upward.

The splines need to be aligned before the big spring is compressed, there is a special tool available, or many shops use a cut-off intermediate shaft. I simply use a full length intermediate shaft since it doesn't interfere with my make-shift spring compressor.

Pre-lube the lower half of the shaft with ATF to ease assembly and removal:

__________________
95' 2wd Junker Drag Truck
1502 HP Fuel-Only 12mm P7100 Pump
SXE 472 over GTX55 116mm
OEM 12v Block
Last edited by Big Blue24; 04-10-2014 at 01:00 PM.
|
|
|
|
|
04-10-2014, 01:27 PM
|
#49
|
Name: Big Blue24
Title: Comp Diesel Sponsor
Status: Not Here
Join Date: Jan 2008
Location: Cedar City, UT
Member`s Gallery
Posts: 6,310
|
Compress the 820# spring and install (2) snap rings: 1 round and 1 flat:


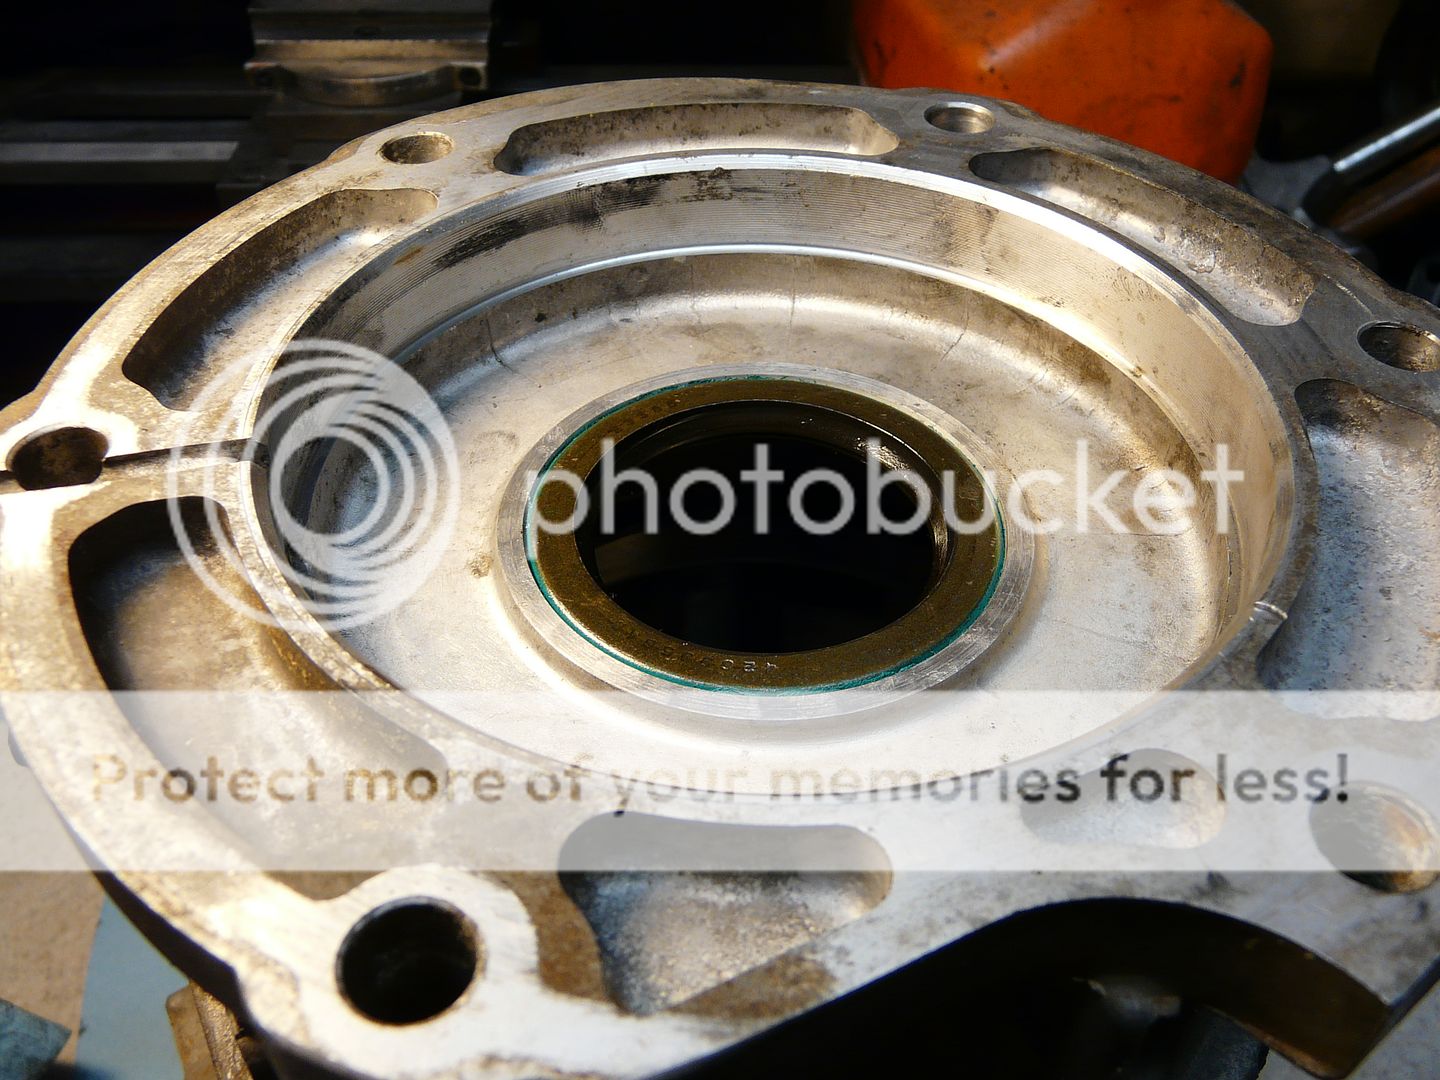
After the spring is compressed, the main output shaft bearing can be installed:

Now the assembly is ready to be installed in the main overdrive housing, there is a large snap ring, externally accessed the must be spread to slip over the rear bearing and land in the bearing race's receiver groove.


Prop up the output shaft assembly on something at least 2" tall, this pickle jar works excellent! The lower the housing over the output shaft assembly and spread the snap ring over the bearing:


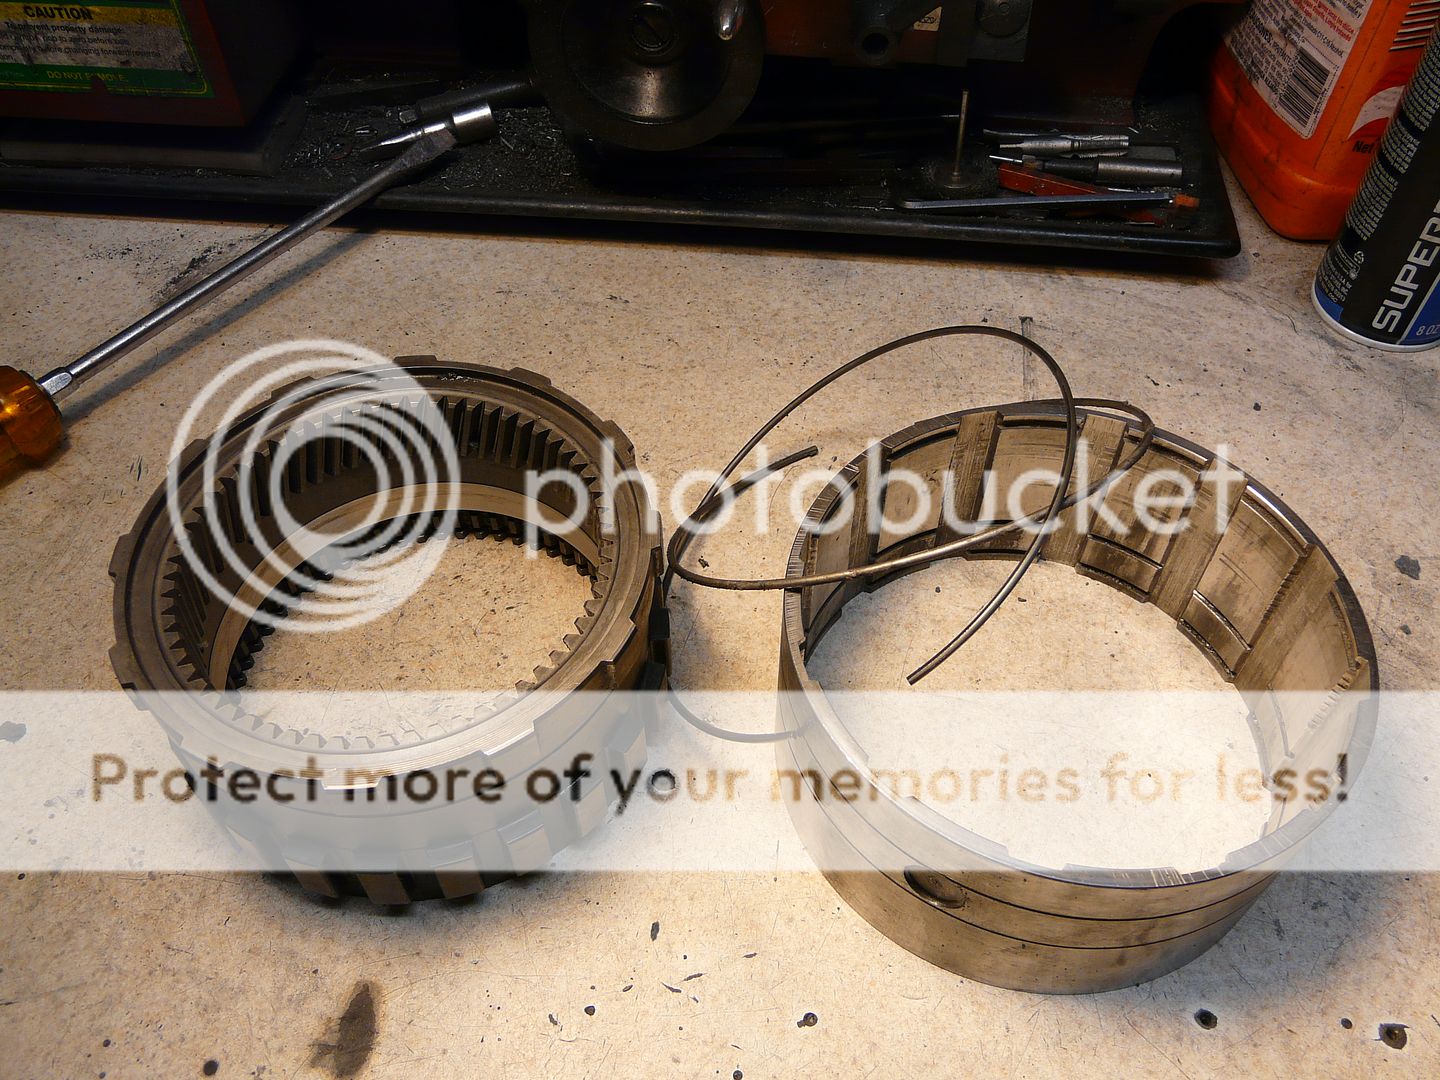
Next install the overdrive brake clutches, stock 47re has (5), stock 48re has (6), this one had been converted back to (5) when the Dodge dealer rebuilt it several years ago.


Stepped reaction plate, this is stock on 48re's but purchased in the aftermarket for this build to revert back to (6) clutch overdrive setup:


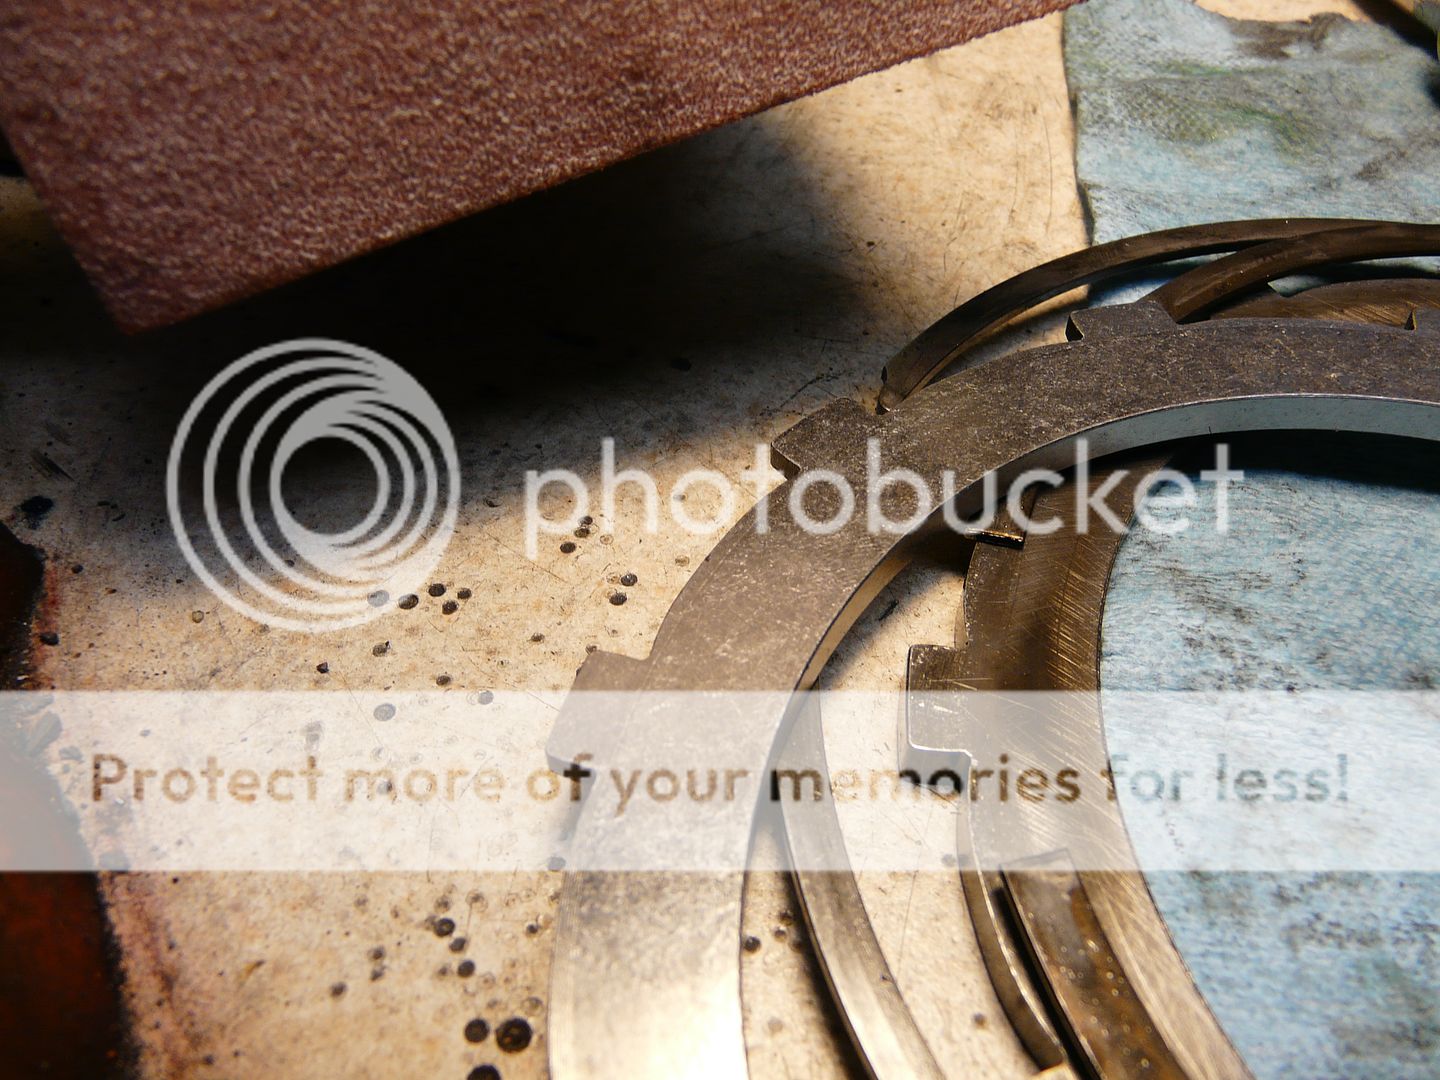
Palm sander to roughen up the face of the plates for more bite, everything wears smooth after a few thousand miles but those first thousand miles feel nice and aggressive to give the customer confidence in their new tranny!!!


New clutches and steels, ready to be pre-soaked in ATF

Install lower snap ring and waved snap ring if you want a little softer overdrive engagement, otherwise remove the waved snap ring and just use (1) regular.
Install stepped reaction plate and add clutches and steels:


Top it off with the wire snap ring/retainer in the groove above the last steel:

__________________
95' 2wd Junker Drag Truck
1502 HP Fuel-Only 12mm P7100 Pump
SXE 472 over GTX55 116mm
OEM 12v Block
|
|
|
|
|
04-10-2014, 01:49 PM
|
#50
|
Name: Big Blue24
Title: Comp Diesel Sponsor
Status: Not Here
Join Date: Jan 2008
Location: Cedar City, UT
Member`s Gallery
Posts: 6,310
|
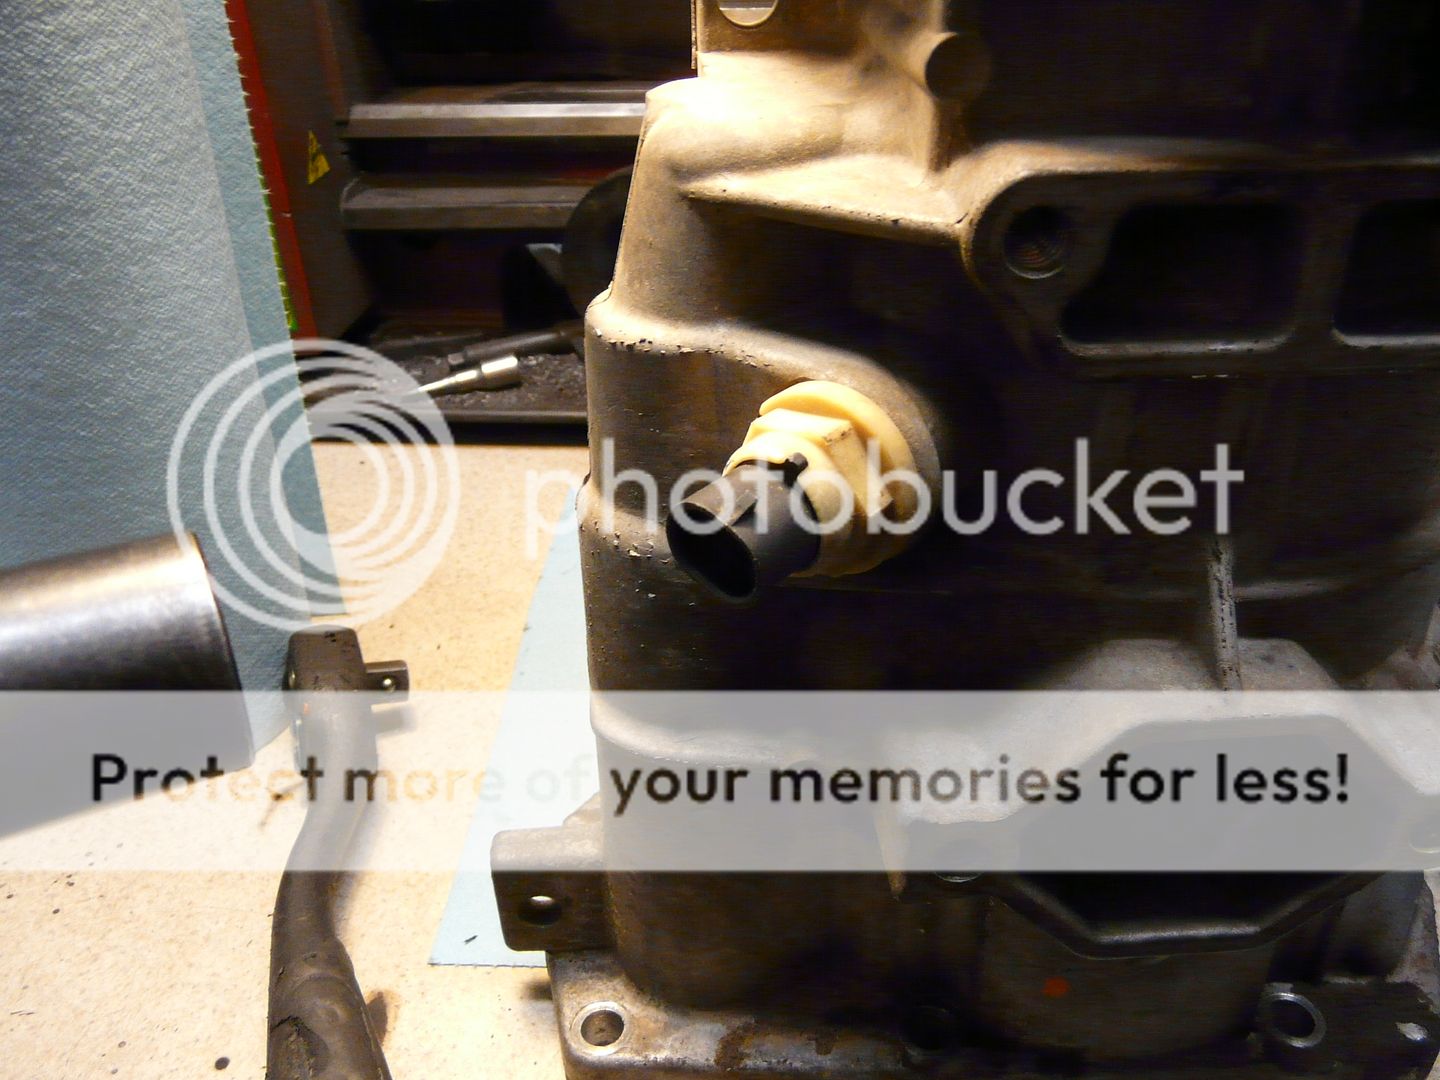
There is a selectable spacer for the lower splines of the intermediate shaft. This spacer adjusts how far the intermediate shaft protrudes into the main transmission case (endplay adjustment). There is a special tool that slips down onto the step in the splines to help measure for a selectable spacer. I use my calipers to measure the distance from the hub down to the step, then from the housing face to the hub.
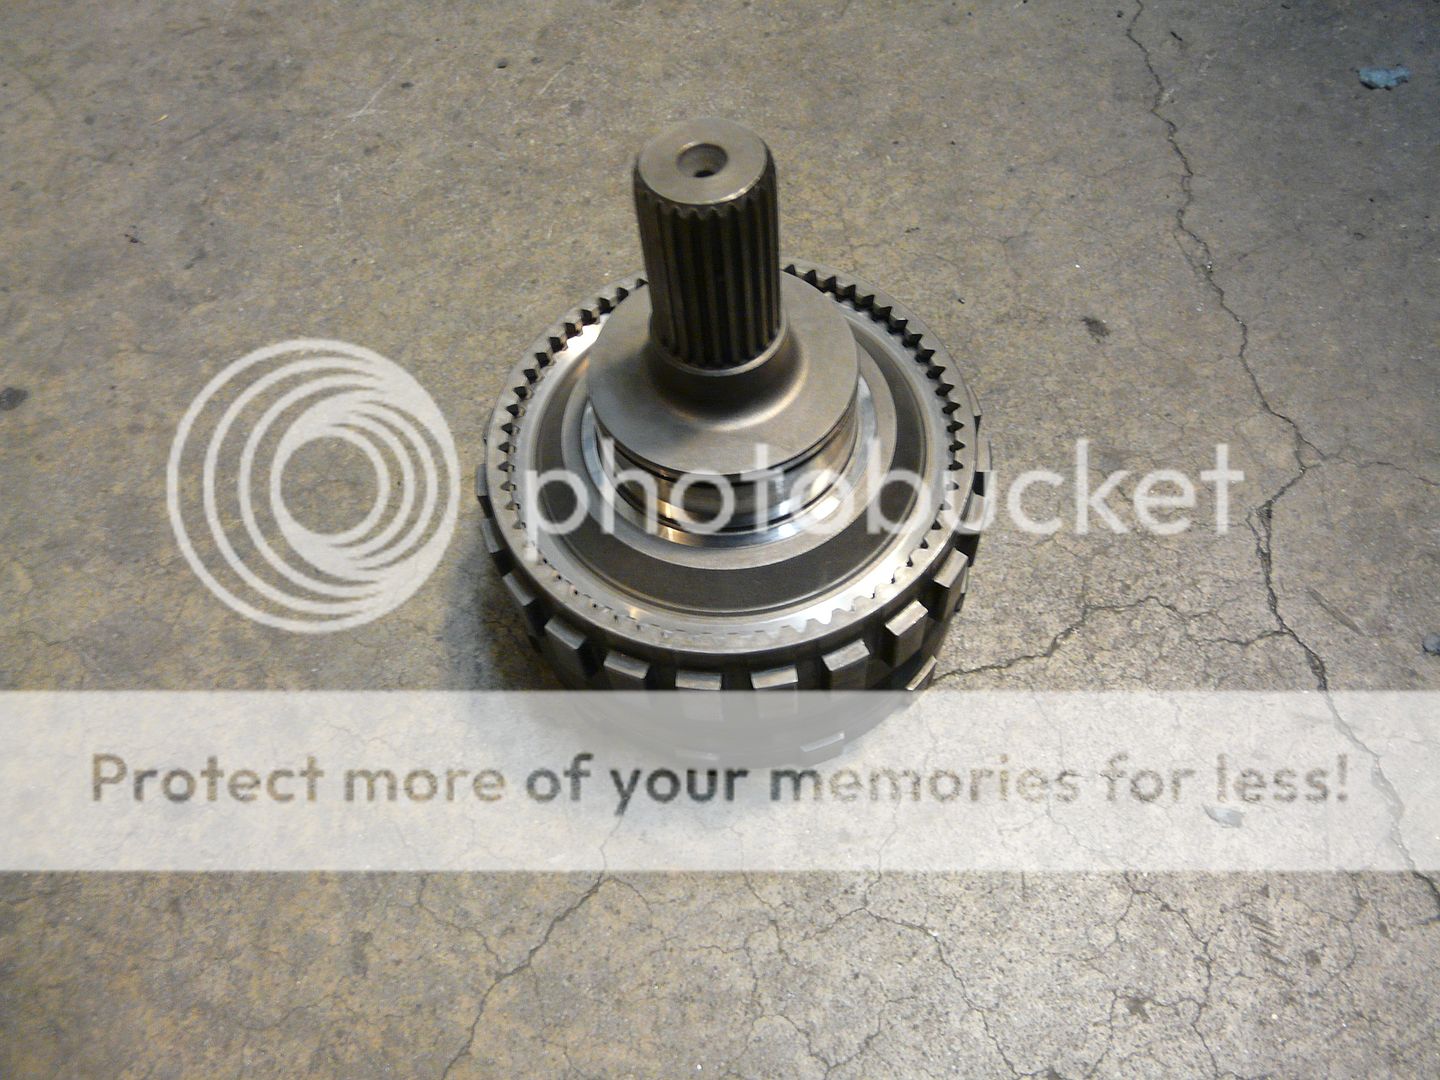
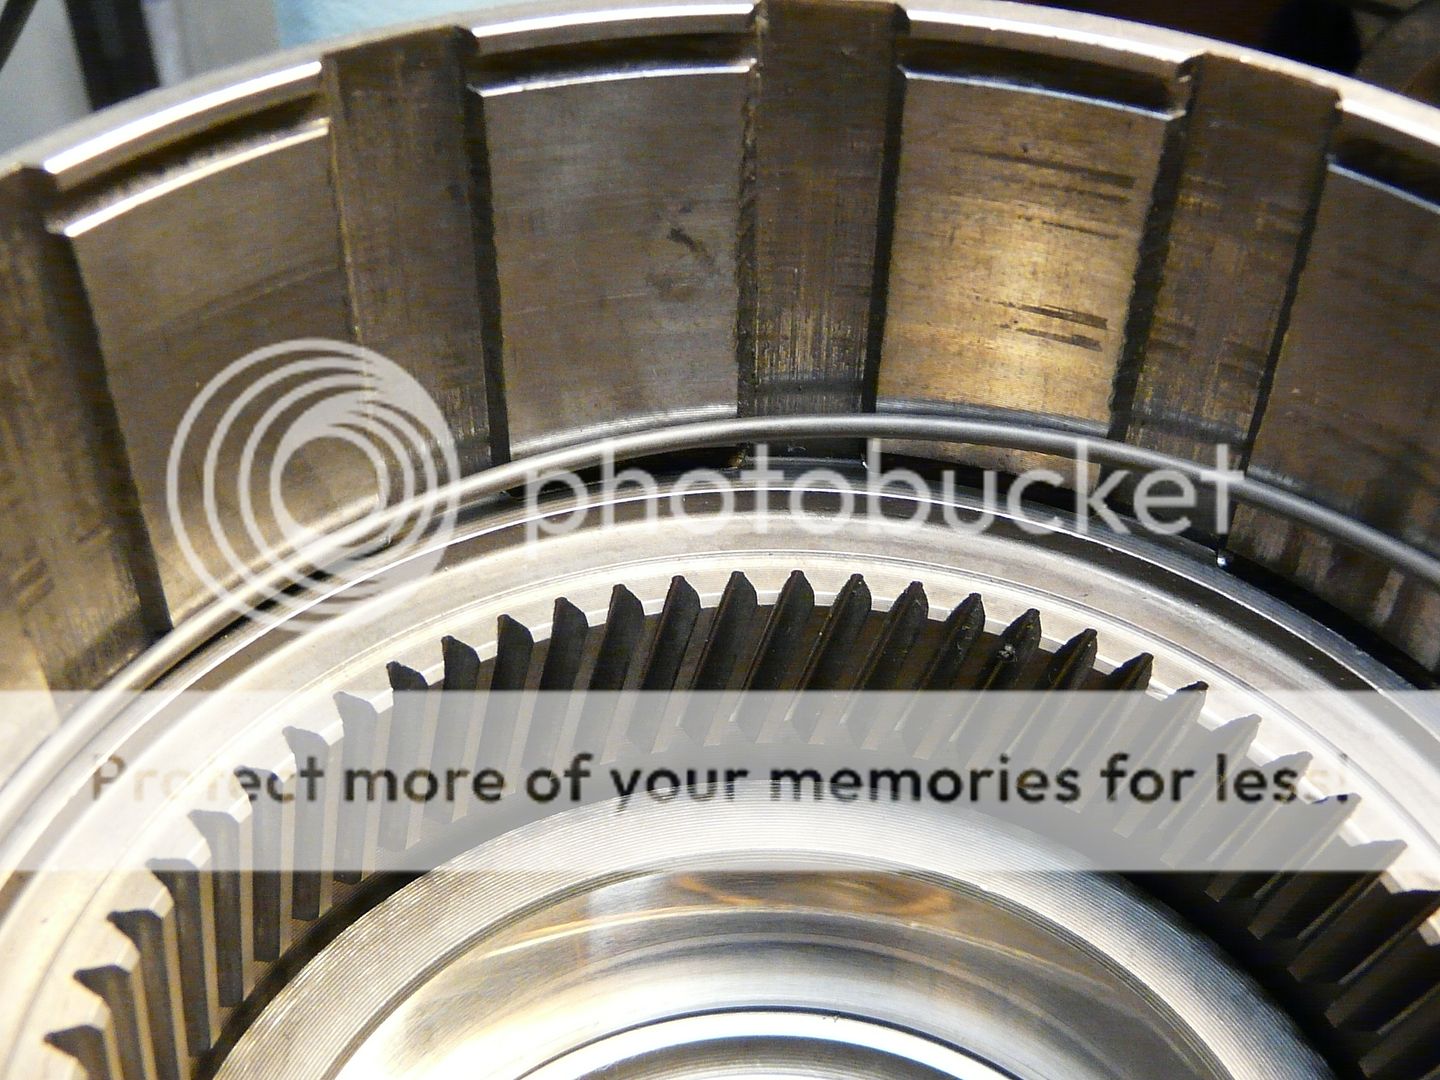
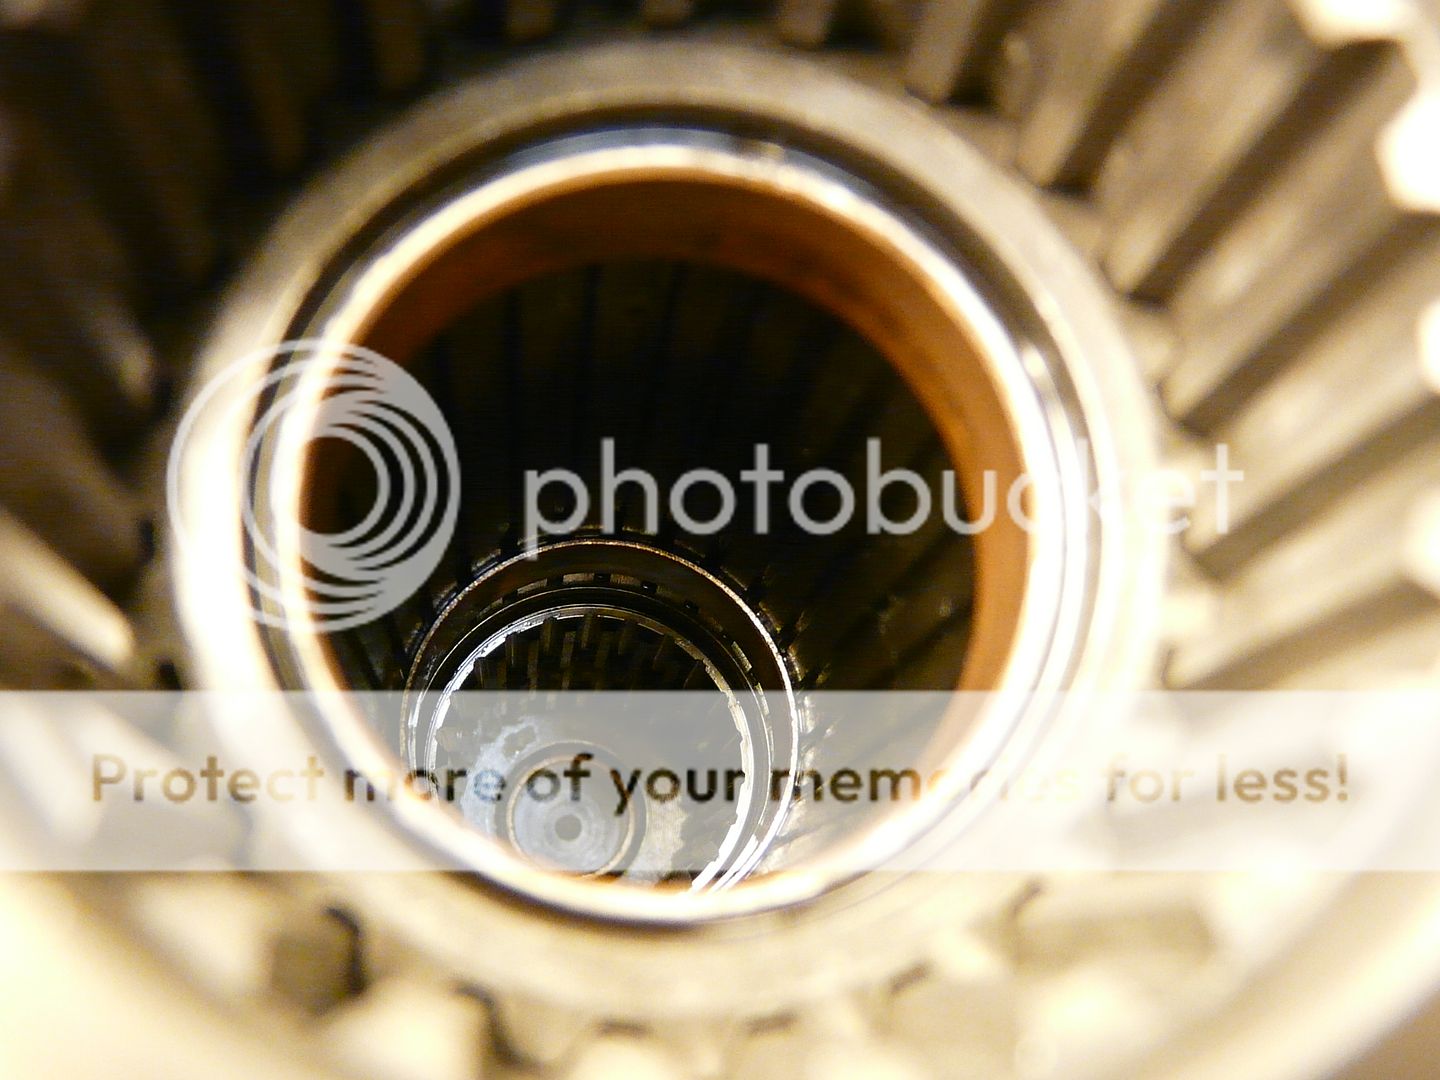
Selectable spacer is shown on intermediate shaft at top of splined portion:

The machined step where the spacer rides is shown in-focus. The two upper rings are the sun shell copper bushings and large enough in bore diameter to not interfere with the measurement.

Using my compound measurement/math method, I came up with 0.780" which calls for a .211" selectable spacer.

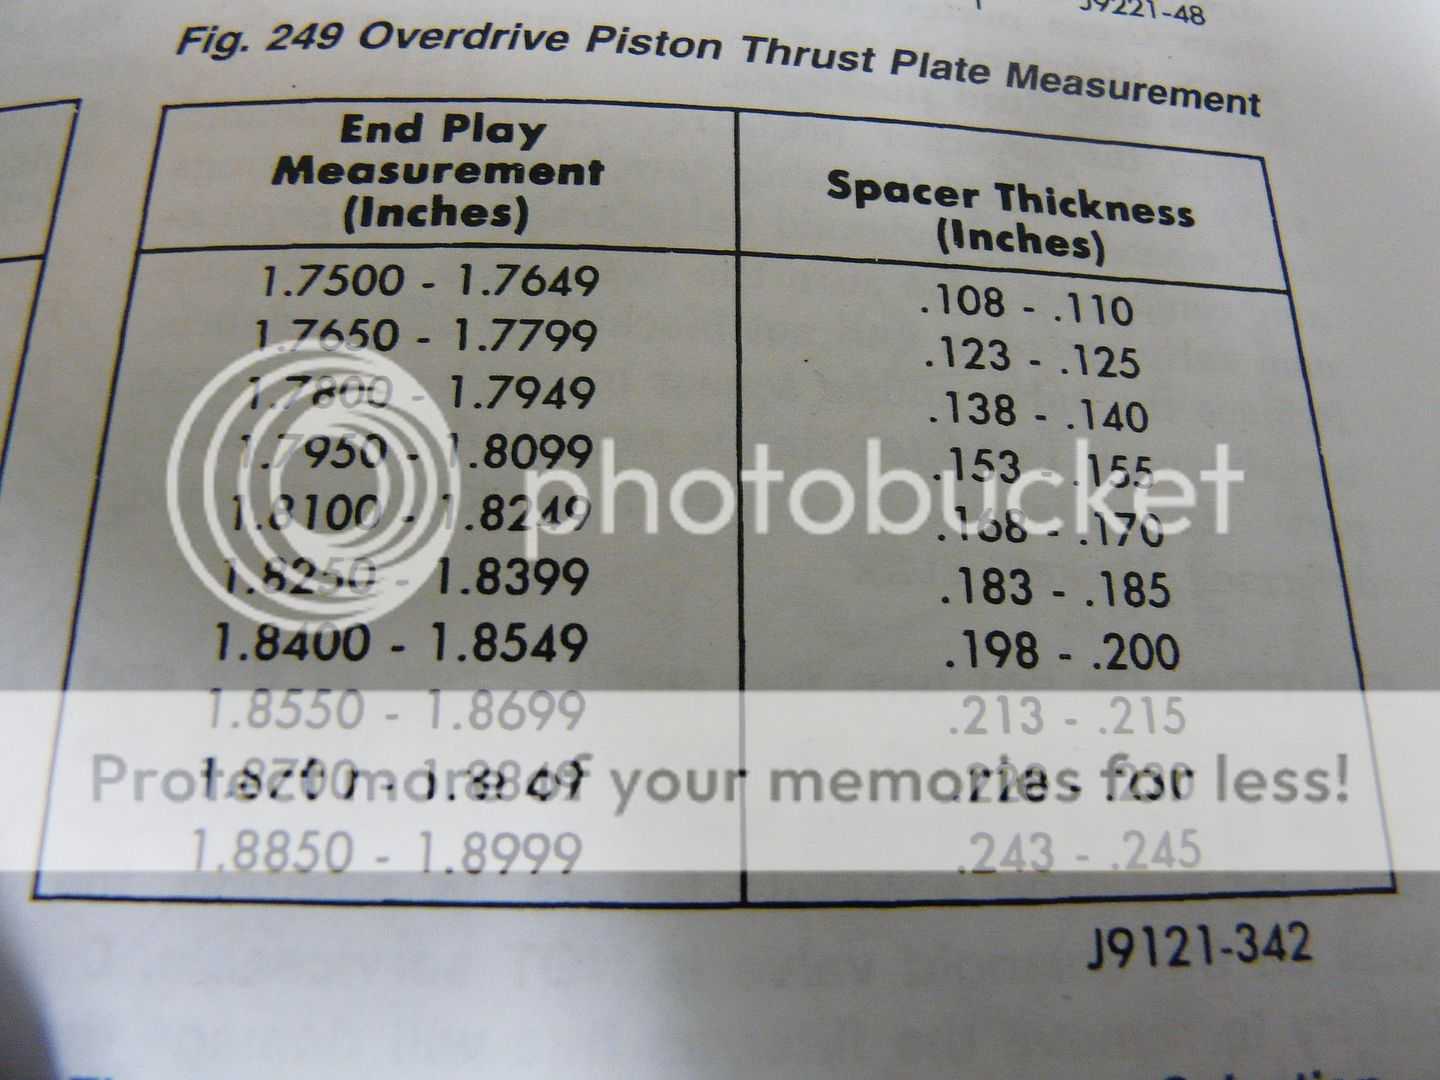
Next we need to select the proper thickness of overdrive piston spacer to correctly time the release of the hub for overdrive direct and application of the overdrive brake clutches. The manual calls for averaging (4) measurements between the hub and the face of the transmission housing using a special tool which is a 1/2" straightedge with a machined slot. I use a 1" thick straightedge and deduct 1/2" from my measurement.

I came up with an average of roughly 2.352", after deducting 1/2" for my 1" tall straightedge in lieu of the 1/2" specialty tool:

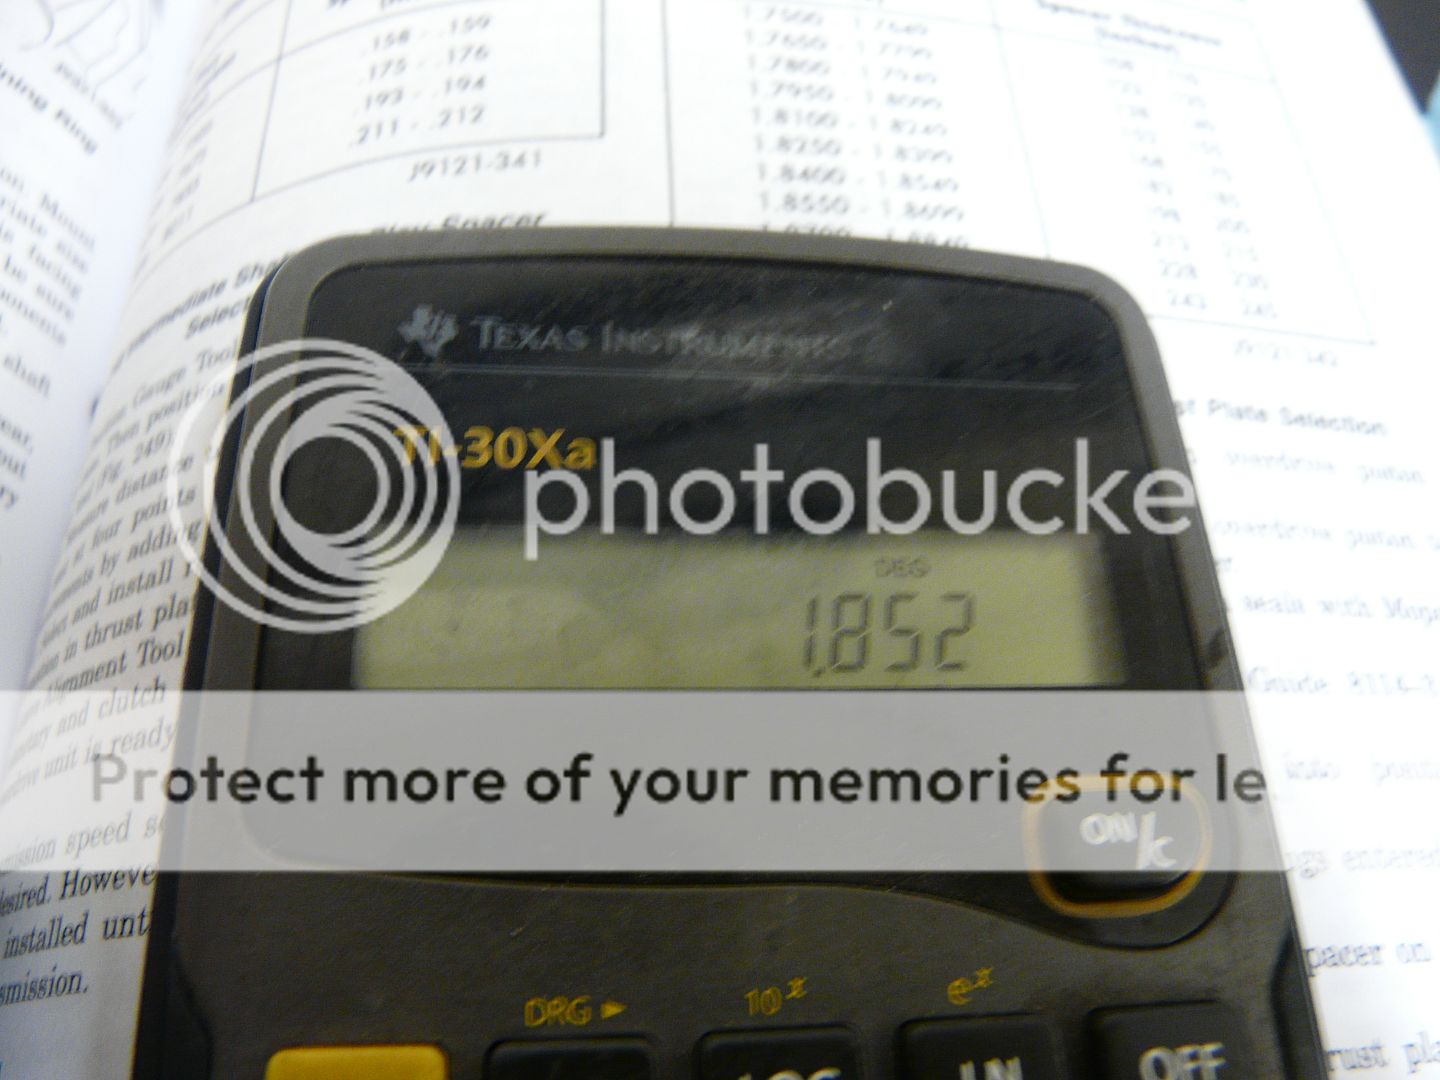
The chart calls for a 0.200" spacer shim:

New bearing to replace old one:

New bearing installed where it will eventually end up, for now it's kept there for safe keeping until the rest of the transmission is ready for final assembly.


__________________
95' 2wd Junker Drag Truck
1502 HP Fuel-Only 12mm P7100 Pump
SXE 472 over GTX55 116mm
OEM 12v Block
Last edited by Big Blue24; 04-10-2014 at 01:52 PM.
|
|
|
|
|
04-10-2014, 04:08 PM
|
#51
|
Name: CorneliusRox
Title: Seasoned Rookie
Status: Not Here
Join Date: Dec 2012
Location: Detroit, MI
Member`s Gallery
Posts: 4,154
|
This is really bad ass. Thanks for making this thread, and I can't wait to hear how that 48re performs!
Also, just to let you know, you said up there that you were going to use a .211" spacer, but I think you mistyped and meant a .193-.194".
Keep up the awesome work man!!
__________________
Corey - BSME '21 Tesla Model 3 Perf
'22 DMax AT4 2500
|
|
|
|
|
04-10-2014, 04:47 PM
|
#52
|
Name: Legendarydslper
Title: Too Much Time
Status: Not Here
Join Date: Nov 2008
Location: Clarkston/Kalamazoo Mi
Member`s Gallery
Posts: 1,840
|
We use alot of the same parts you listed, as do most other builders. I agree that the DNJ Gov Pressue solenoid is the way to go.
__________________
2010 Ram 3500 CCLB SRW Black- Billet S466/SD T4 Manifold and piping/20x12s/33x13.50s/Carli&Fox Suspension
2006 CCLB Black- "Lookin for a Hookup" 2.6 Pull truck project.
|
|
|
|
|
04-10-2014, 06:08 PM
|
#53
|
Name: Big Blue24
Title: Comp Diesel Sponsor
Status: Not Here
Join Date: Jan 2008
Location: Cedar City, UT
Member`s Gallery
Posts: 6,310
|
Quote:
Originally Posted by CorneliusRox
This is really bad ass. Thanks for making this thread, and I can't wait to hear how that 48re performs!
Also, just to let you know, you said up there that you were going to use a .211" spacer, but I think you mistyped and meant a .193-.194".
Keep up the awesome work man!!
|
Yeah, I had a typo but on the measurement, it was supposed to be .788", not .780". And thus the .211" intermediate shaft spacer.
__________________
95' 2wd Junker Drag Truck
1502 HP Fuel-Only 12mm P7100 Pump
SXE 472 over GTX55 116mm
OEM 12v Block
|
|
|
|
|
04-10-2014, 11:07 PM
|
#54
|
Name: CorneliusRox
Title: Seasoned Rookie
Status: Not Here
Join Date: Dec 2012
Location: Detroit, MI
Member`s Gallery
Posts: 4,154
|
Quote:
Originally Posted by Big Blue24
Yeah, I had a typo but on the measurement, it was supposed to be .788", not .780". And thus the .211" intermediate shaft spacer.
|
Good deal. Just wanted to let you know in case it wasn't.
__________________
Corey - BSME '21 Tesla Model 3 Perf
'22 DMax AT4 2500
|
|
|
|
|
04-11-2014, 10:25 AM
|
#55
|
Name: WUnderwood
Title: CompD Minion
Status: Not Here
Join Date: Aug 2006
Location: Texas
Member`s Gallery
Posts: 8,418
|
Made this thread a 'sticky'
Awesome thread, Will, you are truly talented. Thanks for the great write-up.
__________________
2011 Ford F-150 Lariat 4X4

RIP BFD99, jponder, and Forrest Nearing
|
|
|
|
|
04-11-2014, 11:03 AM
|
#56
|
Name: LAmiller
Title: THE KT-BOUNDARY
Status: Not Here
Join Date: Aug 2006
Location: Plain City, OH
Member`s Gallery
Posts: 3,603
|
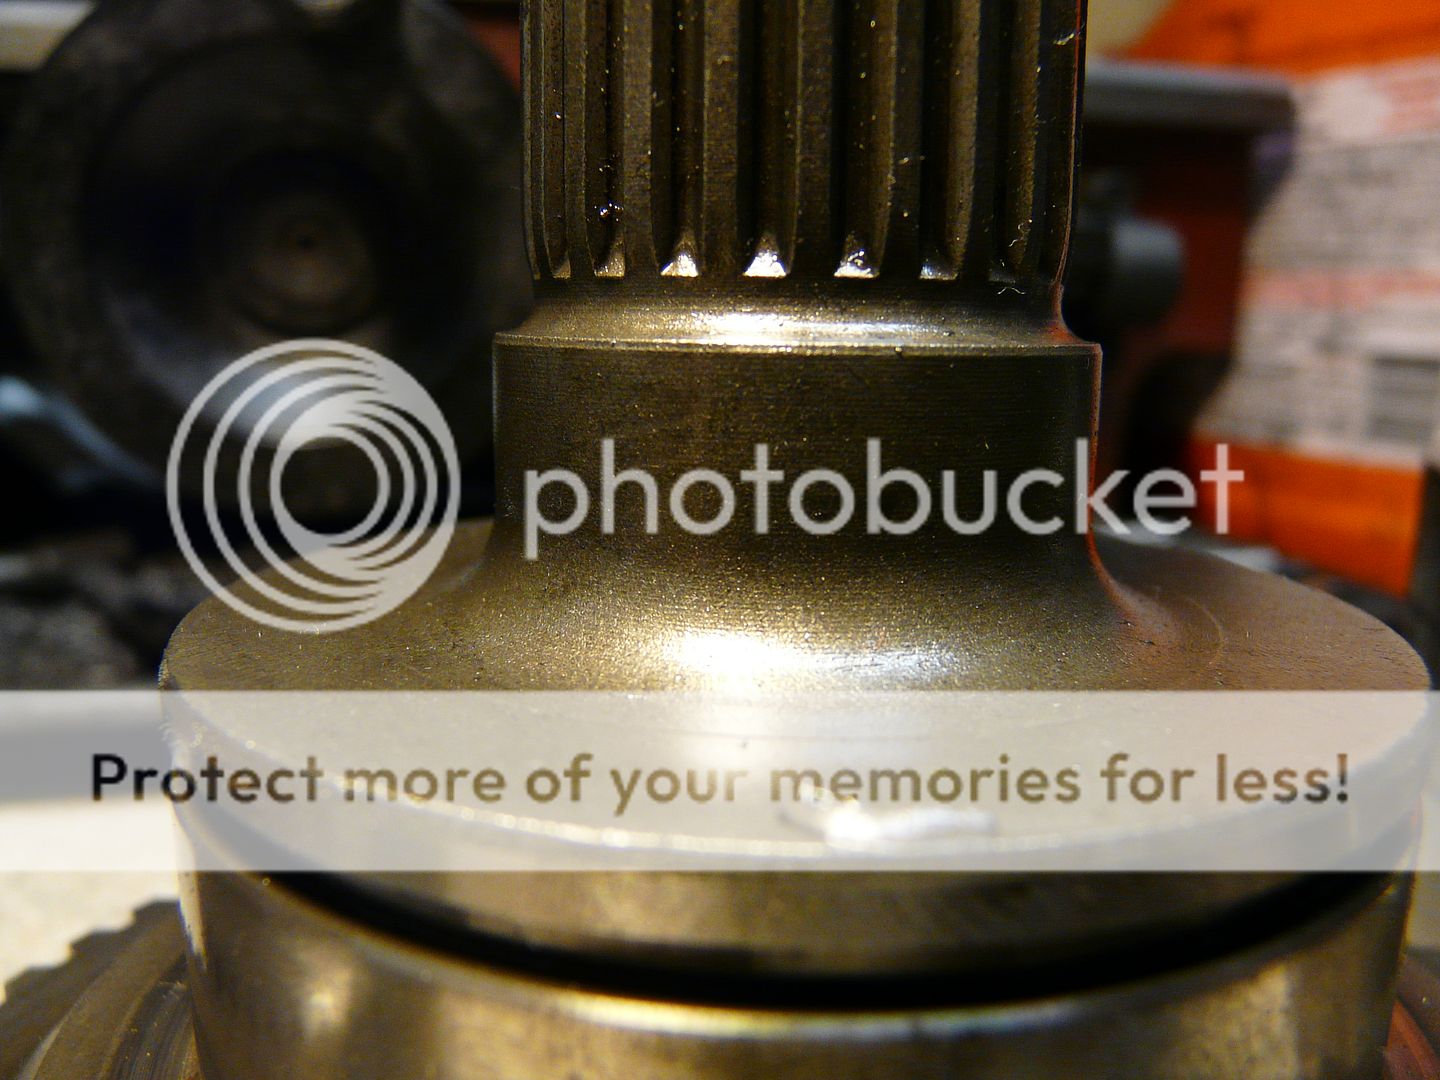
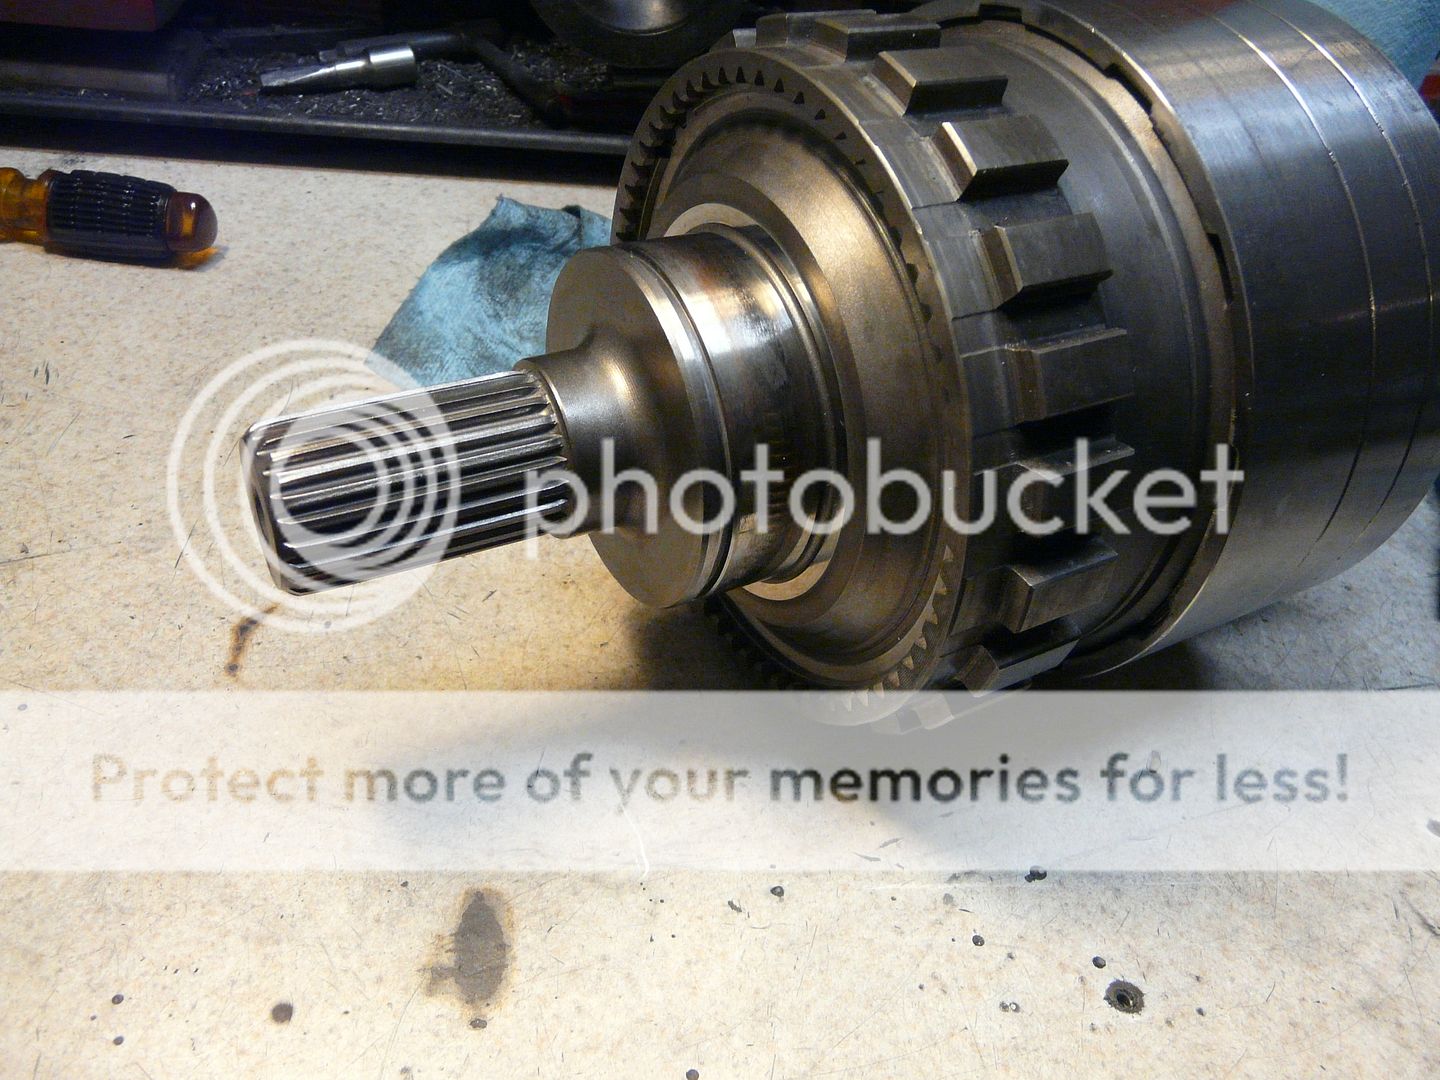
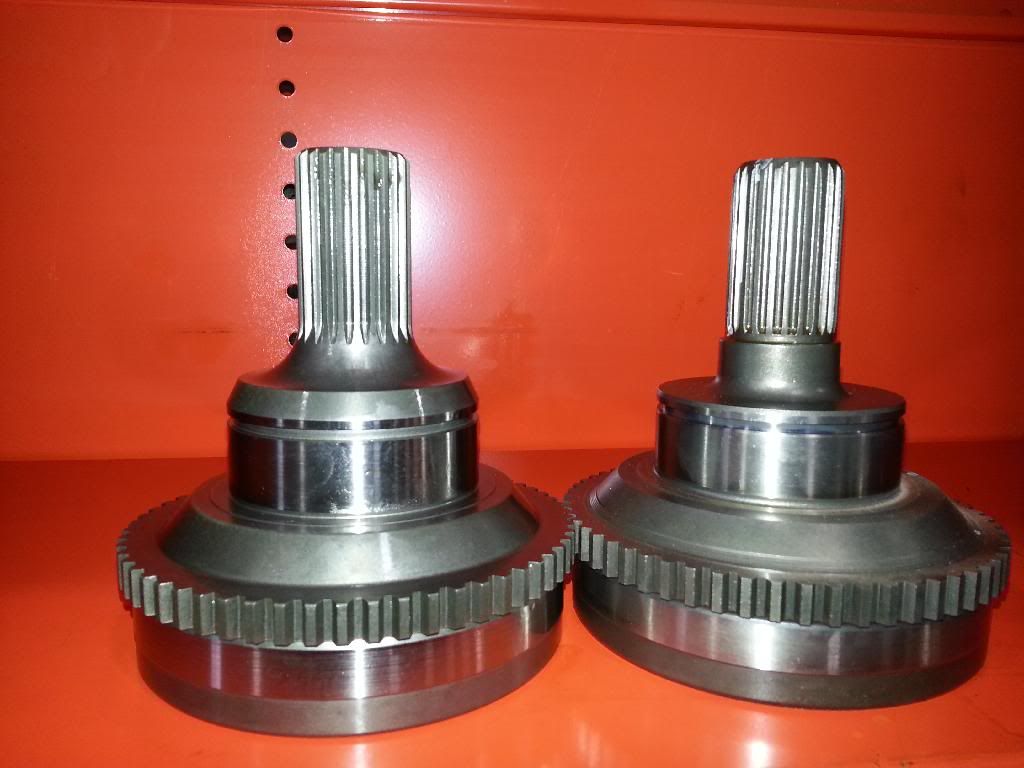
This is what a billet output shaft should look like.
__________________
04.5 QDLB 4x4 Diesel Power Challenge 2014/2015 Champion, ODSS 6.70 Points Champion 2015/2016
06 RaceCab 4x4 Ulimate Callout Challenge 2016, 2017, 2018 Champion, ODSS Pro Street Points Champion 2016
2016 QDLB 4x4, Firepunk EZLynk.
http://www.shop.firepunk.com
|
|
|
|
|
04-11-2014, 11:18 AM
|
#57
|
Name: LAmiller
Title: THE KT-BOUNDARY
Status: Not Here
Join Date: Aug 2006
Location: Plain City, OH
Member`s Gallery
Posts: 3,603
|
Big Blue, I'm going to post some other pics also of some parts comparisons that we have learned along the way. This is by no means anything against what your doing here, just some things we can discuss and learn for all that are watching.
Lavon
__________________
04.5 QDLB 4x4 Diesel Power Challenge 2014/2015 Champion, ODSS 6.70 Points Champion 2015/2016
06 RaceCab 4x4 Ulimate Callout Challenge 2016, 2017, 2018 Champion, ODSS Pro Street Points Champion 2016
2016 QDLB 4x4, Firepunk EZLynk.
http://www.shop.firepunk.com
|
|
|
|
|
04-11-2014, 11:32 AM
|
#58
|
Name: ahale2772
Title: Too Much Time
Status: Not Here
Join Date: Oct 2011
Member`s Gallery
Posts: 2,442
|
^woot
__________________
94 SCLB dually 11.3@122
|
|
|
|
|
04-11-2014, 11:42 AM
|
#59
|
Name: Big Blue24
Title: Comp Diesel Sponsor
Status: Not Here
Join Date: Jan 2008
Location: Cedar City, UT
Member`s Gallery
Posts: 6,310
|
Quote:
Originally Posted by LAmiller
Big Blue, I'm going to post some other pics also of some parts comparisons that we have learned along the way. This is by no means anything against what your doing here, just some things we can discuss and learn for all that are watching.
Lavon
|
Feel free to post and share ideas and lessons learned, etc.
Quote:
Originally Posted by LAmiller
This is what a billet output shaft should look like.
|
I confirmed with the transmission owner and the output shaft he supplied is a "hardened shaft" from Kenny's Pulling Parts, so it's probably just a cryo treated stock shaft. I didn't buy it or supply it so if it lets loose....  I guess he can step up to a better shaft with the much beefier fillets like the shaft you posted.
__________________
95' 2wd Junker Drag Truck
1502 HP Fuel-Only 12mm P7100 Pump
SXE 472 over GTX55 116mm
OEM 12v Block
|
|
|
|
|
04-11-2014, 12:01 PM
|
#60
|
Name: LAmiller
Title: THE KT-BOUNDARY
Status: Not Here
Join Date: Aug 2006
Location: Plain City, OH
Member`s Gallery
Posts: 3,603
|
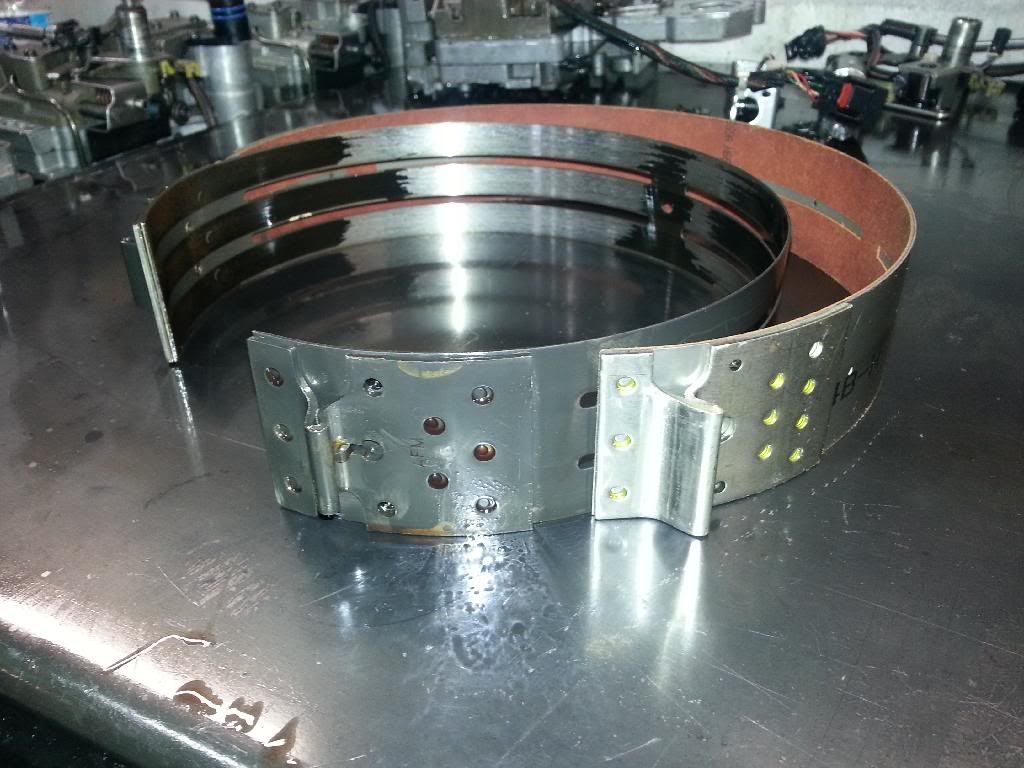
We've tried a lot of different band setups and have found the Borg Warner solid flex band to hold up to locked 2-3 shifts better then any of the OEM style bands with only 8 rivets. The Borg Warner band has 10 rivets holding the anchor to the band vs 8 on the OEM style band. We have seen 3 of the OEM style bands (friction material irrelevant) break in half along the top row of rivets, we have yet to see the BW with 10 rivets fail.
The Rigid bands tend to burn the front or back of the band off from getting into a bind and not being able to flex and apply the whole width of the drum. Most of these problems were only found on 900+HP trucks.
__________________
04.5 QDLB 4x4 Diesel Power Challenge 2014/2015 Champion, ODSS 6.70 Points Champion 2015/2016
06 RaceCab 4x4 Ulimate Callout Challenge 2016, 2017, 2018 Champion, ODSS Pro Street Points Champion 2016
2016 QDLB 4x4, Firepunk EZLynk.
http://www.shop.firepunk.com
|
|
|
|
 Posting Rules
|
You may not post new threads
You may not post replies
You may not post attachments
You may not edit your posts
HTML code is Off
|
|
|
All times are GMT -5. The time now is 06:19 AM.
|