Porting and Polishing pics

Jim Fulmer said:
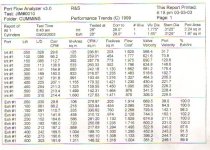
We ran into the valve issue a few years ago, seems that the head would not flow enough for it to matter, the only other thing we did was cut the valves 45/45 and they actually wanted to go further. On the head porting he drilled two holes in the plenum on either end to allow access to #1 and #6, after the porting was finished he threaded plugs in the holes.

Jim

We? Do you by chance have the flow numbers? I have some valves that appear to be cut at 45/45 they are out of what was reffered to as a stage 2 head. I disagree with the 45 degree angle cut but have no real world data to back it up yet.

As mentioned earlier I have been doing research on things like making a 1.600 valve for the intakes in leu of the 1.300, enhanced unshrouding of the valve, merit/costs of doing a 5 angle vs 3 angle grind. However the next thing to happen, even though all casting marks in the air ports are obviously removed, polishing and glassbeading is going to be done in the attempts to help assist airflow speed some. On my 24V there is no way one could open the #6 restriction enough to make a significant difference by blind porting. Its just a dumb casting design. I know Budda power and J&H both have done similar on the plenum idea as I am finally doing right now.


Chris are you trying to hurt my feelings or something? lol The pushrod tubes are a 1.5 thou press, (they are .0015 bigger in diameter than the cavity they where installed in.) sure they slide in after soaking for two minutes in liquid nitrogen but I guarantee you they aint falling out. I didn't get to close to any water jackets, I have a head that sooner or later will be cut in half and plan on sending it to RIPS show room so people can see how much material they have to work with. But I had no problem finding out that info with visual checks of the open water jackets and a piece of 14 guage solid wire.
 
Opie said:
Chris are you trying to hurt my feelings or something? lol The pushrod tubes are a 1.5 thou press, (they are .0015 bigger in diameter than the cavity they where installed in.) sure they slide in after soaking for two minutes in liquid nitrogen but I guarantee you they aint falling out. I didn't get to close to any water jackets, I have a head that sooner or later will be cut in half and plan on sending it to RIPS show room so people can see how much material they have to work with. But I had no problem finding out that info with visual checks of the open water jackets and a piece of 14 guage solid wire.

Nope...I'm just curious about what has been done...:D I just got one of Rip's Stage 3 heads (12v) and yours is a lot more advanced. Definitely looks like something I would be interested in down the road, so the more info I can find about it now, the more I can forget about :hehe:

The past has shown you've done your homework on the projects you've undertaken;)
Chris
 
Opie

Opie that is extraordinary! I wish that i had the money to remove the plenum from my head but ran out of the green to quick. Im planning on building a second motor here soon for my truck and will get the plenum removed On that head but for financial reasons now ill have to deal with just reworked intake bowls!
Luke
 
Hey Chris what kind of numbers on the stage three's? Did the head make a big diff on the dyno??
 
luke h said:
Opie that is extraordinary! I wish that i had the money to remove the plenum from my head but ran out of the green to quick. Im planning on building a second motor here soon for my truck and will get the plenum removed On that head but for financial reasons now ill have to deal with just reworked intake bowls!
Luke

I totally understand the green restriction. There are so many ideas I can not persue for the same reason. Did you flow yours after doing the bowl work? As for costs my big payment is more in time than money. I am building my motor right now and every step seems to have issues that require time to correct.

Jim thanks for posting your flow numbers. I hope to be able to post a couple sheets stock vs this current project.

Chris thanks for the kind words. Truth be known I am looking into putting a certain VP44 back on the map. As was the case when I bought it, the VP44 has fallen and considered to be the weakest hp of the ISB's. As for your Stage 3 have you by chance noticed your boost numbers running a little lower than before?
 
Flow numbers

Opie,
I wasnt able to get them flowed due to the money situation. I have been off work due to a broken arm since Apr. As well as having a 9 month old girl and getting engaged money just seems to go out the door as soon as i get it.

I understand what you mean about delays! I realized the other day degreeing my cam in that there was a mishap with my cam from scheids and i had received the wrong cam. One with to long a duration for my decked pistons to clear!
 
not to step on anyones toes, put light pushrods ? weight does not matter on the pushrod side of the rocker. now on the valve side thats a different story.

scot
 
oil-burner said:
not to step on anyones toes, put light pushrods ? weight does not matter on the pushrod side of the rocker. now on the valve side thats a different story.

scot


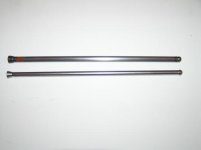
Get off my toes! :hehe: I am not sure what drove RIP selling chrome moly pushrods but I bought them as soon as I heard about them. I guess I should post a pic of them too.
 
Pic of pushrods side by side

FWIW the new pushrod weight was 64 grams the stock one was 108 grams. So the math says the new ones are 41 percent lighter.Pushrods.JPG
 
I think you went the wrong way on pushrods, you should put the biggest diameter pushrod you possiblly could in you given space. with the dia. you show there i would bet you will have major pushrod deflection. valve train stability is a must, plus throw in major amounts of boost pushing against the face of the valve which transfers to the pushrod (x's the rocker ratio) and it's a greater force = bent pushrods.
on the 410 sprint motors we build we run a manton pushrod (the absolute best pushrod there is) it's a 9/16 to 1/2 taper .188 wall. these things look like a small piece of rebar. We saw no horsepower gain but the valve guides and valve job lasted 10 times longer. most prostock engines run a 5/8 dia pushrod.
we have spent countless hours on a spintron (a giant electric motor that spins a engine up to rpm, then a high speed camera takes pictures of the valve train)to help understand valvetrain gremlins. i'ts unbelevible hom much stuff moves at rpm, i've seen pushrods become strings of wet spaghetti, and valve springs look like the a slinky.
The factort pushrod in a 12v motor is a 3/8 dia, about .062 wall. I went with a 7/16 .120 wall pushrod for my application. If you want check out www.mantonpushrods.com for some very interesting tech.

scot
 
Schoust said:
Hey Chris what kind of numbers on the stage three's? Did the head make a big diff on the dyno??

Truck's not running yet...and I changed too many things at once. Head, Cam, intercooler, and I'm even going to have to swap my charger:(


Opie said:
Chris thanks for the kind words. Truth be known I am looking into putting a certain VP44 back on the map. As was the case when I bought it, the VP44 has fallen and considered to be the weakest hp of the ISB's. As for your Stage 3 have you by chance noticed your boost numbers running a little lower than before?

I hope so...the ONLY thing I care about is EGT reduction, and if it helps on the smoke great! A 12v can make the power with fuel, but I want to make it run as clean and cool as possible. Water and/or nitrous may be involved!

Should have the truck running this week...I've ran into a couple snags with wrong parts, and some missing pieces off a turbine wheel:(

I'll report back!
Chris
 
has anyone ran a dyno before and after a full port job ?

i am thinking on doing mine and was wondering if it is worth it
 
Graphic Man said:
has anyone ran a dyno before and after a full port job ?

i am thinking on doing mine and was wondering if it is worth it

From stock to a Piers' stage 2 with .10 gasket was 31 rwhp don't remember the tq.
 
FWIW to you guys. Luke said he removed almost a coffee can full of stuff from his head. You need to get the truck done Luke. I wanna ride. :st:
 
oil-burner said:
we have spent countless hours on a spintron (a giant electric motor that spins a engine up to rpm, then a high speed camera takes pictures of the valve train)to help understand valvetrain gremlins. i'ts unbelevible hom much stuff moves at rpm, i've seen pushrods become strings of wet spaghetti, and valve springs look like the a slinky.

scot

That would be awesome to see some of those videos.
 
Daniel

Daniel you will get a ride as soon as i get my cam back! Hopefully i can get it here before this holiday weekend and get the truck done.
 
oil-burner said:
I think you went the wrong way on pushrods, you should put the biggest diameter pushrod you possiblly could in you given space. with the dia. you show there i would bet you will have major pushrod deflection. valve train stability is a must, plus throw in major amounts of boost pushing against the face of the valve which transfers to the pushrod (x's the rocker ratio) and it's a greater force = bent pushrods.
on the 410 sprint motors we build we run a manton pushrod (the absolute best pushrod there is) it's a 9/16 to 1/2 taper .188 wall. these things look like a small piece of rebar. We saw no horsepower gain but the valve guides and valve job lasted 10 times longer. most prostock engines run a 5/8 dia pushrod.
we have spent countless hours on a spintron (a giant electric motor that spins a engine up to rpm, then a high speed camera takes pictures of the valve train)to help understand valvetrain gremlins. i'ts unbelevible hom much stuff moves at rpm, i've seen pushrods become strings of wet spaghetti, and valve springs look like the a slinky.
The factort pushrod in a 12v motor is a 3/8 dia, about .062 wall. I went with a 7/16 .120 wall pushrod for my application. If you want check out www.mantonpushrods.com for some very interesting tech.

scot


I have faith in RIPS pushrods he ran them on his race truck last season. FWIW he has other valvetrain components in the works as well. He runs over 4k rpm but I plan on staying under that.
 
wow, for the cost of the rods, it's just about worth it to replace them just for peace of mind. I'm obviously not making the power being referred to in this thread but...

Opie, are you also making them and is their cost compatible to mantons ?

A question though.... I suppose there should be a weak link somewhere to avoid huge damage. Would it be better having a push rods that were a little more forgiving as that link or should they be as solid as they can be ?
 
triton said:
wow, for the cost of the rods, it's just about worth it to replace them just for peace of mind. I'm obviously not making the power being referred to in this thread but...

Opie, are you also making them and is their cost compatible to mantons ?

A question though.... I suppose there should be a weak link somewhere to avoid huge damage. Would it be better having a push rods that were a little more forgiving as that link or should they be as solid as they can be ?

Nope, I don't make them but will be trying them out with a homade lifter.

The motor I am building is kind of a hobbie thing that should have some mean attitude by the end of next race season. Most everything on the motor is going to be massaged.

http://www.sourceautomotive.biz/sa_pushrods.htm
 
Back
Top