
You are using an out of date browser. It may not display this or other websites correctly.
You should upgrade or use an alternative browser.
You should upgrade or use an alternative browser.
Project F-Wagon
- Thread starter j.fondler
- Start date
j.fondler
Slow Learner
Awesome project.
Thanks to everyone for the compliments/encouragement.
Why must we adult instead of just hobby wrench all day every day?
2wpuller
letting the smoke fly
Thanks to everyone for the compliments/encouragement.
Why must we adult instead of just hobby wrench all day every day?
Because we like it.
Dale:woohoo:
j.fondler
Slow Learner
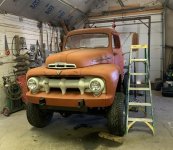
GET IN YOUR HOME!!!!!
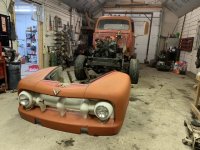
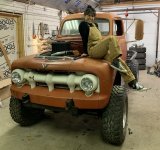
Sun shines on a dogs rear every once in awhile. Engine and trans fit perfectly. I did no kind of test fitting of trans tunnel/floor clearance prior to mounting the body and I got lucky, like within an inch or 2 lucky. I had also moved the engine crossmember back 5 1/2” and hadn’t test fit that either.
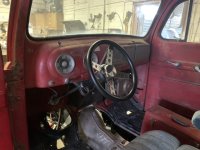
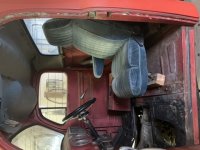
Got the trans crossmember moved and mounted up. New steering wheel in. Test fit of my free.99 suburban seats was a success so they’ll get some angle iron and saddle blanket covers. Also thought I was going to have to take some leaves out of the rear to level it out once the engine was in but it’s damn near perfect. The flatbed should make up the difference.
Next is the front clip so I can start wiring this pig. Not even sure where to fit a battery.
Also, idk if I mentioned this but these wheels/tires are not staying on the truck. I have some 16.5x9.75 steel wagon wheels and 37x12.50 MTs for it.
Sun shines on a dogs rear every once in awhile. Engine and trans fit perfectly. I did no kind of test fitting of trans tunnel/floor clearance prior to mounting the body and I got lucky, like within an inch or 2 lucky. I had also moved the engine crossmember back 5 1/2” and hadn’t test fit that either.
Got the trans crossmember moved and mounted up. New steering wheel in. Test fit of my free.99 suburban seats was a success so they’ll get some angle iron and saddle blanket covers. Also thought I was going to have to take some leaves out of the rear to level it out once the engine was in but it’s damn near perfect. The flatbed should make up the difference.
Next is the front clip so I can start wiring this pig. Not even sure where to fit a battery.
Also, idk if I mentioned this but these wheels/tires are not staying on the truck. I have some 16.5x9.75 steel wagon wheels and 37x12.50 MTs for it.
Attachments

j.fondler
Slow Learner
That is some serious fab skillz man.
Not sure if sarcasm but thanks, lol.
I wouldn’t call myself a fabricator in the least. I’m just hacking my way through this
j.fondler
Slow Learner
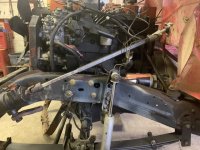
We can now turn.
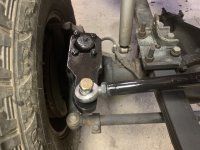
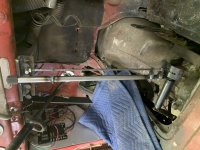
Worlds cheapest crossover steering complete. Cut the steering arm from 1” plate. Heated and bent the stock pitman arm down to clear the frame. 7/8” rod ends ftw.
Finished off the steering shaft. Angle looks funky but turns smooth and doesn’t bind.
Worlds cheapest crossover steering complete. Cut the steering arm from 1” plate. Heated and bent the stock pitman arm down to clear the frame. 7/8” rod ends ftw.
Finished off the steering shaft. Angle looks funky but turns smooth and doesn’t bind.
Attachments


j.fondler
Slow Learner
Way behind on updates
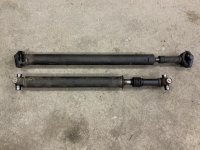
Some odds and ends. Got the front clip and side steps mounted. Made a battery tray. Lengthened the linkage for the tcase shifter and got that installed. Shortened my rear shaft and then used another spare rear shaft I had to make a 1410 front shaft with no CV.
Some odds and ends. Got the front clip and side steps mounted. Made a battery tray. Lengthened the linkage for the tcase shifter and got that installed. Shortened my rear shaft and then used another spare rear shaft I had to make a 1410 front shaft with no CV.
Attachments
-
 31D08AE0-C9BB-4085-8EAA-C257CBF67055.jpeg132.9 KB · Views: 0
 -
 C22FC774-A468-4F61-867A-EDC85D7E3C3F.jpeg104.2 KB · Views: 0
 -
 26A7C505-1266-4681-83FB-EA9388D614B0.jpeg153.4 KB · Views: 0
 -
 8EB35ADD-868C-443D-8B92-5F305BDA2E5B.jpeg123.5 KB · Views: 0
 -
 CB143099-A2B8-4F61-8C65-ACD92BFC7362.jpeg114.8 KB · Views: 0
j.fondler
Slow Learner
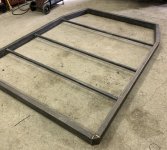
Flatbed!
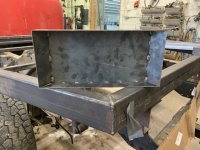
Got bored with the front of the truck so took a day to build the bed. Hack hack: if all you have is a crooked old shop floor, wood shims are your friend! I used 2x4 tubing for the main frame, 1.25” tubing for the cross beams, and finished it off with 1.25” thick decking. Made the back plate to accommodate the trucklite LED tails and a recessed license plate. Still need to weld some D rings on the sides for tie down points and maybe skirt the sides some to hide the frame rails. Would also like a headache rack with some KC lites eventually. Plan is to leave it raw and let it rust!
Got bored with the front of the truck so took a day to build the bed. Hack hack: if all you have is a crooked old shop floor, wood shims are your friend! I used 2x4 tubing for the main frame, 1.25” tubing for the cross beams, and finished it off with 1.25” thick decking. Made the back plate to accommodate the trucklite LED tails and a recessed license plate. Still need to weld some D rings on the sides for tie down points and maybe skirt the sides some to hide the frame rails. Would also like a headache rack with some KC lites eventually. Plan is to leave it raw and let it rust!
Attachments
-
 0359B726-EE8D-4C5F-9AE5-9ACC234D22DB.jpeg115.3 KB · Views: 0
 -
 BF39D8C6-9CCF-4876-B04E-45CA8F87259D.jpeg113 KB · Views: 0
 -
 6D083237-9198-4BA9-BE6C-A6DEEF651C0C.jpeg109.7 KB · Views: 0
 -
 6A52AB66-B386-4F19-A6BF-A9E9EB8A5E2D.jpeg159 KB · Views: 0
 -
 B3E91CEC-84A2-4616-82AE-C3F448B59A95.jpeg136.3 KB · Views: 0
Last edited:
j.fondler
Slow Learner
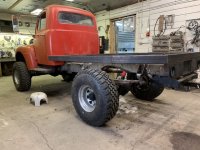
More flatbed pics. The bed is 73” wide, same as the front fenders and tapers down to 55” wide which is the width of the top of the cab. 99” overall length. Also, picked up this tool box/40 gal fuel tank combo local used, which will be my only fuel tank. Wanted to get rid of the stock tank. The 37s make their debut as well, lol. Picked up some 37x12.50x16.5 BFG baja t/a(hmmwv take offs) and put em on 16.5x9.75 wagon wheels.
Attachments

j.fondler
Slow Learner
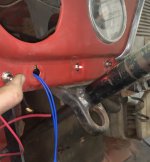
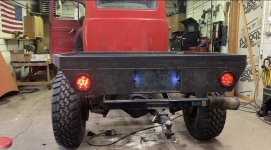
Wiring and lights
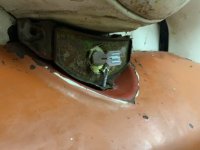
So the truck never had turn signals. I guess they were a dealer option for the rear but never for the front. So I converted the running lights up front to an 1157 socket with LED bulbs. Headlights are Hella Ecode housings, H4 bulbs on relays with high/low beam diode. Tails are trucklite LED with built in backup lights and some LED plate lights to keep Johnny law off my ass. Used a turn signal toggle on the dash and since it never had turn signals, it also didn’t have indicators, so I found this retro looking LEDs for the dash as indicators.
So the truck never had turn signals. I guess they were a dealer option for the rear but never for the front. So I converted the running lights up front to an 1157 socket with LED bulbs. Headlights are Hella Ecode housings, H4 bulbs on relays with high/low beam diode. Tails are trucklite LED with built in backup lights and some LED plate lights to keep Johnny law off my ass. Used a turn signal toggle on the dash and since it never had turn signals, it also didn’t have indicators, so I found this retro looking LEDs for the dash as indicators.
Attachments

j.fondler
Slow Learner
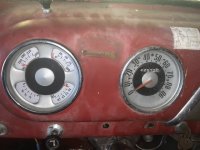
Gauges
Tossed around trying to make the factory gauges work but didn’t want to dump a bunch of money into them just to have unreliable 70 year old gauges. So I bought some Bosch gauges and made em fit the old cluster. The only extra gauge I’m adding is a trans temp gauge in the center console.
Tossed around trying to make the factory gauges work but didn’t want to dump a bunch of money into them just to have unreliable 70 year old gauges. So I bought some Bosch gauges and made em fit the old cluster. The only extra gauge I’m adding is a trans temp gauge in the center console.
Attachments


j.fondler
Slow Learner
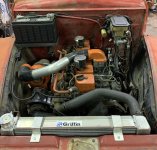
Engine bay is getting close. The little lady finally came out to the farm to see the truck in person for the first time.
My latest built not bought item is the floor shifter. Locks out in every gear so it can’t bounce into reverse when I’m bombing down a section line at 60 mph.
My latest built not bought item is the floor shifter. Locks out in every gear so it can’t bounce into reverse when I’m bombing down a section line at 60 mph.
Attachments
4x4dually
Moderator
Tossed around trying to make the factory gauges work but didn’t want to dump a bunch of money into them just to have unreliable 70 year old gauges. So I bought some Bosch gauges and made em fit the old cluster. The only extra gauge I’m adding is a trans temp gauge in the center console.
:clap: Nicely done.
Meyers Farms
Active member
Looking great! How much room do you have between the engine and radiator? I’m going to be tackling this same project in a 53 and it’s getting me excited seeing your truck come together.
j.fondler
Slow Learner
Looking great! How much room do you have between the engine and radiator? I’m going to be tackling this same project in a 53 and it’s getting me excited seeing your truck come together.
The rad is about 3 1/4” thick, 2” space between rad and fan, clutch fan is about 3”. So you have a good 8” to work with.
The back of the engine is 1.5” from the firewall and the overall depth of the engine bay is 41 3/4”
Some math and you can figure what you have space for. I don’t think a 53 is as deep
Last edited:
j.fondler
Slow Learner
coming along good man. how close to true did you get your driveshafts?i made my first driveshaft for my tj today,not nearly as hard as i thought.
I used a piece of paper to draw a line, cut the yoke off, then used my chop saw to cut down to length, then just pressed the yokes back in and welded em up. I’ve done this on a few trucks now after watching a local shop do it and not balance them